1

Kilitbahir

Kilitbahir https://ngatapuwae.govt.nz/gallipoli/cape-helles From this fort the Ottoman army first watched British and French ships arrive – and readied themselves to defend. Ngā Tapuwae Trails /sites/default/files/stop/media/04%20cape%20helles%402x.jpg

From this fort the Ottoman army first watched British and French ships arrive – and readied themselves to defend.

GALL_Zone4_Loc_KilitBair_48k24bit_20.mp3
Read this story

Kilitbahir

You’re standing at one of the Turkish forts that defended the Dardanelles when the British and French battleships attacked on 18 March 1915. Ships came from your right, which is the mouth of the Dardanelles nearly 15 kilometres from here. The Turkish defence was based on batteries of guns like this one here, which covered a series of minefields stretching out across the water in front of you. There was also rows of mines, one behind the other, all the way up the strait, covered by these guns. 

Out towards the mouth on the far shore, there was a single row of mines running parallel to the shore, it was laid by the Nusrat, a tiny Ottoman minelayer. This single row of mines was placed there because the Ottoman officers saw that when the battleships came in to bombard the forts, they turned in a wide circle, which covered the area where the mines were laid. 

The British plan was for their minesweepers – which were converted fishing trawlers – to clear the way. However, the current was so strong that the trawlers could not keep up with the battleships. Meanwhile both minesweepers and battleships were under intense Turkish artillery fire. Because the minesweepers couldn’t clear the way, the battleships had no choice but to swing round in an arc and, of course, ran onto that row of mines. Three ships were sunk and three badly damaged. This caused the British and French Admirals to call off the attack. 

This gun position is very important because it is here, with many of the gun crew killed, and with the hoist mechanism damaged, that Corporal Seyit single-handedly lifted up one of the shells that you see here, he staggered with it up the steps and loaded it into the gun. His incredible strength and courage led to him being recognised as one of the heroes of this battle. 

The defeat of the naval attempt to break through on 18 March 1915 led the Allies to decide that they had no choice but to mount an invasion to take the peninsula, in order to let the navies get through. This victory over the British and French navy made the Ottoman government in Constantinople determined to resist the invasion they knew would come, and they strongly reinforced the peninsula.

How to get here

Getting there

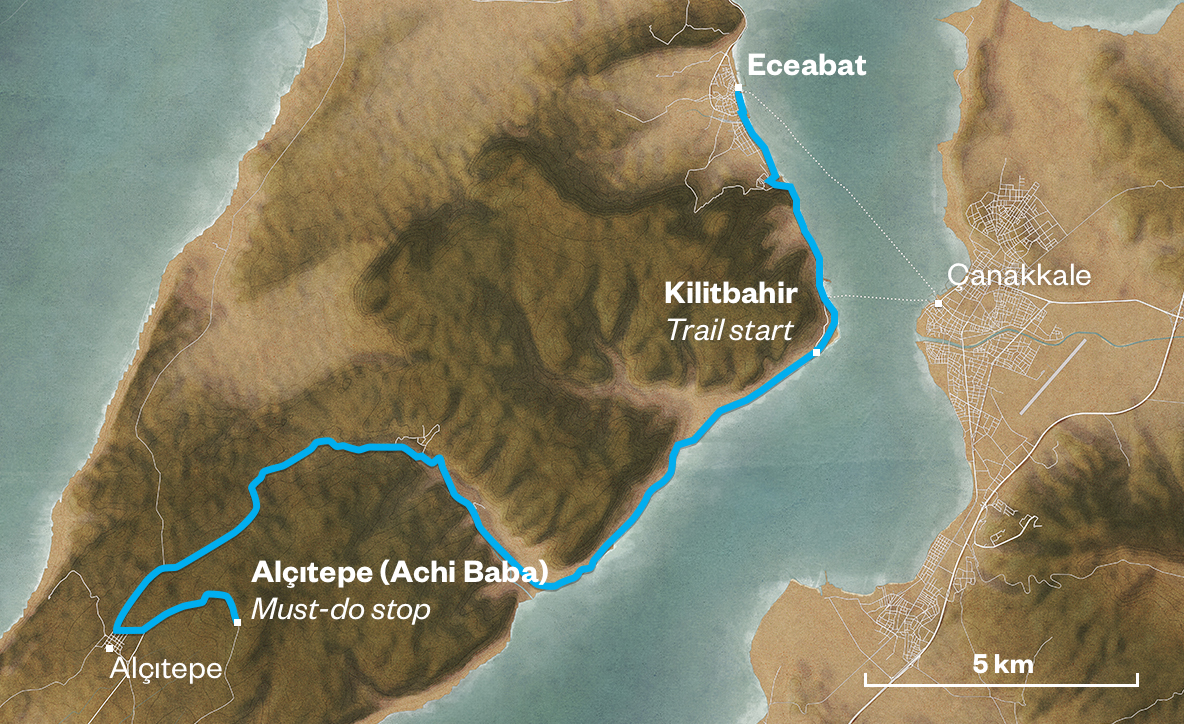
From the ferry wharf in Eceabat, turn left and follow the road alng the Dardanelles coast 200 metres before it turns right, then take the turn to the left 50 metres on to continue south down the coast. After 4.5 kms you will come to the village of Kilitbahir.

Continue along the coast road, passin the Ottoman era Kilitbahir Castle on the right of the road and then the Turkish artillery position the Namazgah Tabyasi (Namazgah Battery) on the left just after the castle.

A further 250 metres along the road, at the edge of the village, a stabilized track opens in front of you on the right. Take this track as it climbs for 75 metres, ending in a car park in the rear of the Mecidiye Tabyasi (Mecidiye Battery). Walk into the battery area and to the large artillery gun. 

Where to stand 

Stand on the seaward side of the cannon looking out over the Dardanelles Strait.

GPS
40°8'27"N
26°22'31"E
Decimal GPS
40.14096
26.37536
  • The HMS Irresistible listing heavily after the explosion of a floating mine.
    The HMS Irresistible listing heavily after the explosion of a floating mine.Credits

    Public Domain http://upload.wikimedia.org/wikipedia/commons/4/43/HMS_Irresistible_abandoned_18_March_1915.jpg 

  • A view of the gun positions of the Kilitbahir Fort overlooking the Dardanelles, December 1918 - February 1919
    A view of the gun positions of the Kilitbahir Fort overlooking the Dardanelles, December 1918 - February 1919Credits

    National Army Museum, NZ 1992.745.4 http://nam.recollect.co.nz/nodes/view/4774

  • Corporal Seyit carrying a shell.
    Corporal Seyit carrying a shell. Credits

    Public Domain http://en.wikipedia.org/wiki/Seyit_%C3%87abuk#mediaviewer/File:Seyid_Onbashi.jpg

  • Mounted Riflemen sit on a naval gun at Fort Kilitbahir, the pattern painted on the gun was an attempt to disguise it from aerial observation.
    Mounted Riflemen sit on a naval gun at Fort Kilitbahir, the pattern painted on the gun was an attempt to disguise it from aerial observation.Credits

    National Army Museum, NZ 1992.745.1 http://nam.recollect.co.nz/nodes/view/4355

  • The Old Fort at Kilitbahir. The hill on the right was an important wireless station during the Gallipoli Campaign.
    The Old Fort at Kilitbahir. The hill on the right was an important wireless station during the Gallipoli Campaign.Credits

    © IWM Q 14362

Stories & Insights

The night before April 25, Freyberg made an epic swim around the coast – lighting flares to distract the Ottomans.

Soldiers graves, Shrapnel Gully

Public anguish and uncertainty grew in New Zealand, as official lists of Gallipoli casualties slowly appeared in newspapers.

British soldiers at Anzac Cove marching along North Beach.

While trans-Tasman relationships warmed at Gallipoli, new tensions emerged between the New Zealanders and the British.

The Bouvet was one of three Allied battleships sunk by mines during the naval attack on the 18th of March 1915

The Gallipoli campaign's land operations are well known, but Allied warships and submarines also played key roles.

Gasparich fought with the Auckland Battalion alongside the British at Krithia – coping with sparse and confusing orders.

Wounded being brought along side an unidentified hospital ship off Gallipoli. A good view of the barges and the lighter towing them. There look to be a number of walking sick and wounded as well as stretcher cases

Gallipoli was - in the end - just a very small part of the First World War story.

Leadley was a qualified telegraphist, so was given a signaller’s role when he enlisted.

Taking the Cape Helles trail

WARNING: Many locations at Gallipoli are potentially dangerous, and there are undercut cliffs and sudden drops. Go slowly and carefully - and never stand close to a cliff's edge.

Get to Kilitbahir (the start of this trail) from Eceabat

From the ferry wharf in Eceabat, turn left and follow the road along the Dardanelles coast 200 metres before it turns right, then take the turn to the left 50 metres on to continue south down the coast. After 4.5 kms you will come to the village of Kilitbahir. 

Continue along the coast road, passing the Ottoman era Kilitbahir Castle on the right of the road and then the Turkish artillery position the Namazgah Tabyasi (Namazgah Battery) on the left just after the castle. A further 250 metres along the road, at the edge of the village, a stabilized track opens in front of you on the right. Take this track as it climbs for 75 metres, ending in a car park in the rear of the Mecidiye Tabyasi (Mecidiye Battery). Walk into the battery area and to the large artillery gun.

Your stop

Stand on the seaward side of the cannon looking out over the Dardanelles Strait. 

Get to the must-do stop from Eceabat

From the ferry wharf in Eceabat, turn left and follow the road along the Dardanelles coast 200 metres before it turns right, then take the turn to the left 50 metres on to continue south down the coast. After 4.5 kms you will come to the village of Kilitbahir. Continue along the coast road for approximately 5 kms, passing the hamlet of Havuzlar before turning inland. After a further 7 kms you will approach the outskirts of the village of Alçitepe. Just before entering the village there is a road to the left skirting the back of the village. Take this road and follow it for 200 metres, where it forks. Take the left hand road, signposted for the Alçitepe Baki Terasi (Alçitepe Viewing Terrace). Follow this one-way road as it climbs to the east for 2.4 kms, till you come to the viewing terrace on your left.

Your stop

Walk up the steps to the top of the platform. Look out to sea so you can see the four pillars of the Çanakkale Martyrs Memorial on the headland, with a Turkish flag to its left.

No car?
Taxi drivers may take you to the main sites, but this can be expensive. You can also hire a private guide. Group bus tours generally do not cover the area around this trail.

Plan your time

Allow 4 – 5 hours to explore the entire Cape Helles trail.

If you’re short of time, you can simply visit the must-do stop on the trail – Alçi Tepe. The audio guide to Alçi Tepe gives you the big-picture Cape Helles story

Location Collection: 
Location Name: 
Cape Helles
Lat: 
40.1408323091416
Long: 
26.375662868652398

Take the next trail

The next Ngā Tapuwae trail is The Defence. Proceed to Hill 60.
Link to the first stop

Decimal GPS:
40.14096
26.37536
Sequence:
1
Decimal GPS:
40.09741254106555
26.25176380859375
Sequence:
2
Decimal GPS:
40.04212
26.18528
Sequence:
3
Decimal GPS:
40.05153
26.16718
Sequence:
4
Decimal GPS:
40.08778
26.2149
Sequence:
5

Stop Images

Sequence:
1
Decimal GPS Real Location:
40.14096
26.37536
Sequence:
2
Decimal GPS Real Location:
40.09699
26.25241
Sequence:
3
Decimal GPS Real Location:
40.04212
26.18528
Sequence:
4
Decimal GPS Real Location:
40.05153
26.16718
Sequence:
5
Decimal GPS Real Location:
40.08778
26.2149