2

Old No 3 Outpost

Old No 3 Outpost https://ngatapuwae.govt.nz/old-no-3-outpost This rugged maze of trenches was an Ottoman stronghold, until its takeover by the Auckland Mounted Rifles. Ngā Tapuwae Trails /sites/default/files/stop/media/03%20chunuk%20bair%402x.jpg

This rugged maze of trenches was an Ottoman stronghold, until its takeover by the Auckland Mounted Rifles.

GALL_Zone3_Loc_OldNumber3_48k24bit_2.mp3
Read this story

Old No 3 Outpost 

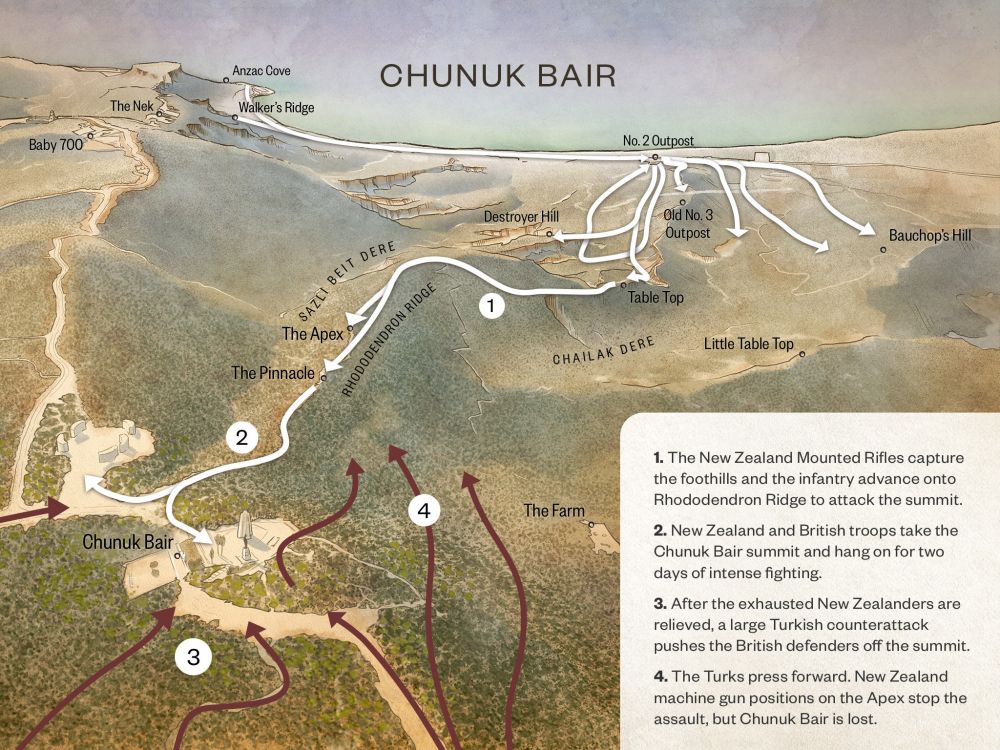
You’re standing on Old Number 3 Outpost. Before the night of 6 August 1915, this was an Ottoman stronghold – until it was taken by the Auckland Mounted Rifles in fierce hand-to-hand fighting. The Auckland Mounteds attacked up these slopes you’re standing on, which were covered with trenches. 

Imagine what it was like that night - the soldiers with bayonets at the ready, advance through a maze of trenches, with vegetation similar to what you see in front of you. It was pitch dark and the only warning the soldiers had was the flash of a Turkish rifle fired from 10 metres away. There were small parties of New Zealand Mounteds, Native Contingent, and Ottomans all intermingled, and so when the Anzacs said they’d cleared the post, the reality was there were still isolated groups everywhere.

Ahead of the New Zealand soldiers was the large hill with a flat top in front of you called Table Top – where the Turks had a stronghold. The Turks heard the sounds of firing from the gully, so they assumed that the attack was going to come out of the gully to your left, which is Chailak Dere. However, instead of coming up that obvious route, the Wellington Mounted Rifles, under Lieutenant-Colonel William Meldrum, crept up the slopes and surprised the Turks from the rear. The Mounteds rounded them up with their bayonets. It was an amazing achievement, and the Turks never suspected they would come this way. 

By the time Table Top was cleared, the New Zealanders were two hours behind schedule. Despite their successes, they were running out of time, and that would become incredibly important in the next few hours.

Meanwhile, the infantry, who’d been waiting by the beach in the Great Sap – the long communications trench running from Anzac Cove to Number 2 Outpost – got the order to start moving forward. The Otago Infantry Battalion advanced inland, along the gully to your left, towards Table Top. But skirmishes broke out in front and behind. Confusion reigned, and in this confusion and the pitch dark, the Canterbury Infantry Battalion, who were in the gully to your right, got lost and went around in a big circle. The Otago Infantry Battalion found itself scattered everywhere. So it was the Wellington Infantry Battalion that passed through the Otagos, below Table Top and pushed forward.

The important thing at this stage was to get to the high ground by daylight, and the Anzac troops were running out of time. The night afforded good cover and the commanders knew that if the men were exposed in daylight halfway up the hill, they could be shot to pieces. 

By 4.30 in the morning, the Wellington Infantry Battalion had arrived at the Apex, and its commander, Lieutenant-Colonel William Malone informed his brigadier and asked for orders.

How to get here

Getting there

WARNING: Many locations at Gallipoli are potentially dangerous, and there are undercut cliffs and sudden drops. Go slowly and carefully - and never stand close to a cliff's edge.

From No. 2 Outpost follow the main trail north and then east for some 750 metres from No. 2 Outpost. When the path begins to drop away in front of you onto a narrow ridge, you will have reached the forward edge of Old No. 3 Outpost.

Where to stand

Stand on Old No. 3 Outpost facing the bare clay cliff face in front of you to the east - this is Table Top.

GPS
40°15'11"N
26°17'20"E
Decimal GPS
40.25331
26.28891
  • During the August attack, New Zealand Mounted Rifles cleared these foothills.
    During the August attack, New Zealand Mounted Rifles cleared these foothills. Credits

    Australian War Memorial G01146 http://www.awm.gov.au/collection/G01146/

  • In the area shown here the New Zealand infantry had some hard fighting on 7/8 August 1915. Little Table Top is shown in the foreground.
    In the area shown here the New Zealand infantry had some hard fighting on 7/8 August 1915. Little Table Top is shown in the foreground.Credits

    Australian War Memorial G01163 http://www.awm.gov.au/collection/G01163/

  • A view of Old No 3 Outpost from No 2 Outpost beside Fisherman's Hut, 1915
    A view of Old No 3 Outpost from No 2 Outpost beside Fisherman's Hut, 1915Credits

    National Army Museum, NZ 1992.742 http://nam.recollect.co.nz/nodes/view/4235

  • Soldiers of the Auckland Mounted Rifles in a Turkish trench on Old No 3 Outpost 
    Soldiers of the Auckland Mounted Rifles in a Turkish trench on Old No 3 Outpost Credits

    Soldiers of the Auckland Mounted Rifles in Turkish trench at Old No 3 Outpost, Gallipoli Peninsula, Turkey, during World War I. Williams, Charles Athol, b 1899 : Photographs of Te Aute Station, Mangakuri Station, the Williams family, and Gallipoli Peninsula in Turkey during World War I. Ref: PAColl-0184-1-015. Alexander Turnbull Library, Wellington, New Zealand. http://natlib.govt.nz/records/22711177

  • 1st Field Ambulance in summer 1915. Looking south across the Chailek Dere towards No 3 Outpost and the ridge that leads to Table Top and on to the Apex.
    1st Field Ambulance in summer 1915. Looking south across the Chailek Dere towards No 3 Outpost and the ridge that leads to Table Top and on to the Apex.Credits

    National Army Museum, NZ 1992.760 http://nam.recollect.co.nz/nodes/view/5933

Stories & Insights

Basset braved hails of bullets to lay telephone wires and enable battlefield communications.

Chunuk Bair, the easternmost point reached by the New Zealanders on the 8th August 1915.

After the battle of Chunuk Bair, many Anzac men's bodies were left where they lay - their clothes falling away, their bones drying.

New Zealand troops share a pipe in a dugout at the Signalling Station on No 2 Outpost.

Installing and maintaining telephone and telegraph lines at the front was difficult work, and sometimes deadly.

A maori tiki carved into the rock along the main sap to Fisherman's hut. The sign reads : NZ Maori pah and a carved hand pointing to the left indicating the Maori meeting place is to the left. 1915

Māori soldiers yelled Te Rauparaha's famous 'ka mate' haka through the night, as they advanced on Sari Bair.

Shot through the neck, Carkeek knew the only way to reach an anchored hospital ship was crawl down to the beach.

A photo of the Bivvy shared between 9/803 Corporal Curll Alexander Gordon Catto and 9/337 Trooper William Parlane (pictured), No 2 Outpost, Gallipoli.

Every Anzac soldier was needed for the attack on Sari Bair, no matter how sick or exhausted he was.

As the Turks closed in, Surgenor found himself the last man standing in a shallow trench.

Take the next trail

The next Ngā Tapuwae trail is Cape Helles. Proceed to Kilitbahir.
Link to the first stop

Decimal GPS:
70.2781824021454
-18.801583281250032
Sequence:
1
Decimal GPS:
67.08850047908513
-20.669259062500032
Sequence:
2
Decimal GPS:
65.56095822213858
-24.009102812500032
Sequence:
3
Decimal GPS:
62.683967149984994
-57.62726687500009
Sequence:
4
Decimal GPS:
52.47176862422445
-79.29230593750009
Sequence:
5
Decimal GPS:
47.65821020919526
-77.64435671875009
Sequence:
6
Decimal GPS:
45.68384002167691
-80.58869265625009
Sequence:
7

Stop Images

Sequence:
1
Decimal GPS Real Location:
40.252
26.28306
Sequence:
2
Decimal GPS Real Location:
40.25331
26.28891
Sequence:
3
Decimal GPS Real Location:
40.25326
26.29429
Sequence:
4
Decimal GPS Real Location:
40.25175
26.3062
Sequence:
5
Decimal GPS Real Location:
40.25159
26.30762
Sequence:
6
Decimal GPS Real Location:
40.25203
26.30828
Sequence:
7
Decimal GPS Real Location:
40.252
26.30853