3

Table Top

Table Top https://ngatapuwae.govt.nz/table-top The fighting was fierce and confused here, as the Anzacs pushed towards Chunuk Bair under cover of night. Ngā Tapuwae Trails /sites/default/files/stop/media/03%20chunuk%20bair%402x.jpg

The fighting was fierce and confused here, as the Anzacs pushed towards Chunuk Bair under cover of night.

GALL_Zone3_Loc_TableTop_48k24bit_201.mp3
Read this story

Table Top

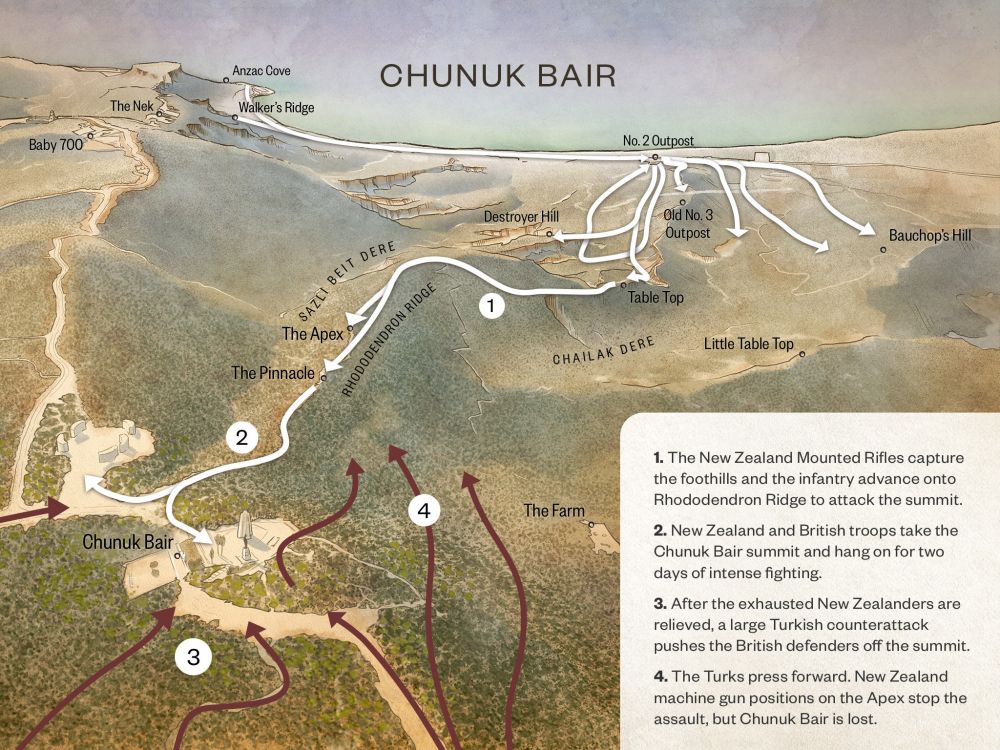
You’re standing on Table Top looking down the valley towards the sea. The gully on your right is Chailak Dere. On the night of 6 August 1915, the Wellington Mounted Rifles secured where you now stand. 

Imagine the soldier leading the Wellington Mounted Rifles. He’d scrabble up the cliff, he’d get to the top, and the next guy would follow him up. He’d be trying not to make a sound because the New Zealanders were vastly outnumbered by the Ottoman defenders. He wouldn’t do anything until he had about a dozen men up with him. Then with a rip and a roar, he would go in with his bayonet in pitch darkness and overwhelm the Turks. The New Zealanders stabbed whoever they could, and the others either surrendered or ran away. 

Meanwhile, Brigadier-General Andrew Russell, commanding the New Zealand Mounted Rifle Brigade, listened for progress of the night attack. The only thing he could hear was the rifle fire of the Turks as they retreated further up the hill, and the war cries of the Māori soldiers who were attached to three of the New Zealand Mounted Rifle Regiments. Russell wrote that it was this that allowed him to judge his men’s progress. 

It was now time for the New Zealand Infantry to advance. This was a nightmare march because there were still scattered groups of Turks everywhere. There was fighting going on all along the valley and the men were very tired. As one soldier said, ‘you were dead from your feet up,’ and if you stayed too long in one position you’d fall asleep. 

The only communication was word of mouth. It was night, it was pitch dark, if you were separated or lost, everything broke down. The Otago Infantry Battalion had lost touch with each other, with soldiers scattered all over the place. The Canterbury Battalion were completely lost, and would eventually go around in a big circle back to where they started.

Brigadier-General Earl Johnston, the commander of the New Zealand Infantry Brigade, told the Wellingtons commanding officer, Lieutenant-Colonel William Malone, to take over the lead. So the Wellington Infantry Battalion passed through the Otagos and took the lead in advancing up the ridge towards Chunuk Bair. 

How to get here

Getting there

WARNING: Many locations at Gallipoli are potentially dangerous, and there are undercut cliffs and sudden drops. Go slowly and carefully - and never stand close to a cliff's edge.

From Old No. 3 Outpost continue along the rough track, crossing a narrow ridge and then climbing a set of steep stairs to reach the summit of Table Top.

Where to stand

Stand on Table Top looking down to the valley below towards the sea.

GPS
40°15'11"N
26°17'39"E
Decimal GPS
40.25326
26.29429
  • Soldiers of the Wellington Mounted Rifles occupying a trench on Table Top during the night of August 6. 1915.
    Soldiers of the Wellington Mounted Rifles occupying a trench on Table Top during the night of August 6. 1915. Credits

    Read, James Cornelius, 1871-1968. Soldiers occupying a trench during the Gallipoli campaign. Read, J C :Images of the Gallipoli campaign. Ref: 1/4-058130-F. Alexander Turnbull Library, Wellington, New Zealand. http://natlib.govt.nz/records/23235687

  • Razor Back leading from Table Top to Old No 3 Outpost. Chailak Dere on right. No 2 Outpost on left near sea. Taken in 1919 from Table Top looking west.
    Razor Back leading from Table Top to Old No 3 Outpost. Chailak Dere on right. No 2 Outpost on left near sea. Taken in 1919 from Table Top looking west.Credits

    Australian War Memorial G01829 http://www.awm.gov.au/collection/G01829/

  • Turkish rifles captured on Big Table Top,  on 6 August 1915.
    Turkish rifles captured on Big Table Top, on 6 August 1915.Credits

    Turkish rifles captured on Big Table Top, Gallipoli Peninsula, Turkey, during World War I. Williams, Charles Athol, b 1899 : Photographs of Te Aute Station, Mangakuri Station, the Williams family, and Gallipoli Peninsula in Turkey during World War I. Ref: PAColl-0184-1-014. Alexander Turnbull Library, Wellington, New Zealand.http://natlib.govt.nz/records/22498216

  • The summit of Big Table Top taken circa 6 August 1915
    The summit of Big Table Top taken circa 6 August 1915Credits

    Summit of Big Table Top, Gallipoli. Williams, Charles Athol, b 1899 : Photographs of Te Aute Station, Mangakuri Station, the Williams family, and Gallipoli Peninsula in Turkey during World War I. Ref: PAColl-0184-1-019. Alexander Turnbull Library, Wellington, New Zealand. http://natlib.govt.nz/records/22316263

  • Maori Contingent soldiers at No 1 Outpost.
    Maori Contingent soldiers at No 1 Outpost.Credits

    Maori Contingent, No 1 Outpost, Gallipoli, Turkey. Read, J C :Images of the Gallipoli campaign. Ref: 1/4-058101-F. Alexander Turnbull Library, Wellington, New Zealand.http://natlib.govt.nz/records/22330949

Stories & Insights

Basset braved hails of bullets to lay telephone wires and enable battlefield communications.

Chunuk Bair, the easternmost point reached by the New Zealanders on the 8th August 1915.

After the battle of Chunuk Bair, many Anzac men's bodies were left where they lay - their clothes falling away, their bones drying.

New Zealand troops share a pipe in a dugout at the Signalling Station on No 2 Outpost.

Installing and maintaining telephone and telegraph lines at the front was difficult work, and sometimes deadly.

A maori tiki carved into the rock along the main sap to Fisherman's hut. The sign reads : NZ Maori pah and a carved hand pointing to the left indicating the Maori meeting place is to the left. 1915

Māori soldiers yelled Te Rauparaha's famous 'ka mate' haka through the night, as they advanced on Sari Bair.

Shot through the neck, Carkeek knew the only way to reach an anchored hospital ship was crawl down to the beach.

A photo of the Bivvy shared between 9/803 Corporal Curll Alexander Gordon Catto and 9/337 Trooper William Parlane (pictured), No 2 Outpost, Gallipoli.

Every Anzac soldier was needed for the attack on Sari Bair, no matter how sick or exhausted he was.

As the Turks closed in, Surgenor found himself the last man standing in a shallow trench.

Take the next trail

The next Ngā Tapuwae trail is Cape Helles. Proceed to Kilitbahir.
Link to the first stop

Decimal GPS:
70.2781824021454
-18.801583281250032
Sequence:
1
Decimal GPS:
67.08850047908513
-20.669259062500032
Sequence:
2
Decimal GPS:
65.56095822213858
-24.009102812500032
Sequence:
3
Decimal GPS:
62.683967149984994
-57.62726687500009
Sequence:
4
Decimal GPS:
52.47176862422445
-79.29230593750009
Sequence:
5
Decimal GPS:
47.65821020919526
-77.64435671875009
Sequence:
6
Decimal GPS:
45.68384002167691
-80.58869265625009
Sequence:
7

Stop Images

Sequence:
1
Decimal GPS Real Location:
40.252
26.28306
Sequence:
2
Decimal GPS Real Location:
40.25331
26.28891
Sequence:
3
Decimal GPS Real Location:
40.25326
26.29429
Sequence:
4
Decimal GPS Real Location:
40.25175
26.3062
Sequence:
5
Decimal GPS Real Location:
40.25159
26.30762
Sequence:
6
Decimal GPS Real Location:
40.25203
26.30828
Sequence:
7
Decimal GPS Real Location:
40.252
26.30853