4

The Apex

The Apex https://ngatapuwae.govt.nz/the-apex Stand here, and tunnels that the Anzacs dug are just beneath your feet. Ngā Tapuwae Trails /sites/default/files/stop/media/03%20chunuk%20bair%402x.jpg

Stand here, and tunnels that the Anzacs dug are just beneath your feet.

GALL_Zone3_Loc_ApexOnRhododendronRid.mp3
Read this story

The Apex

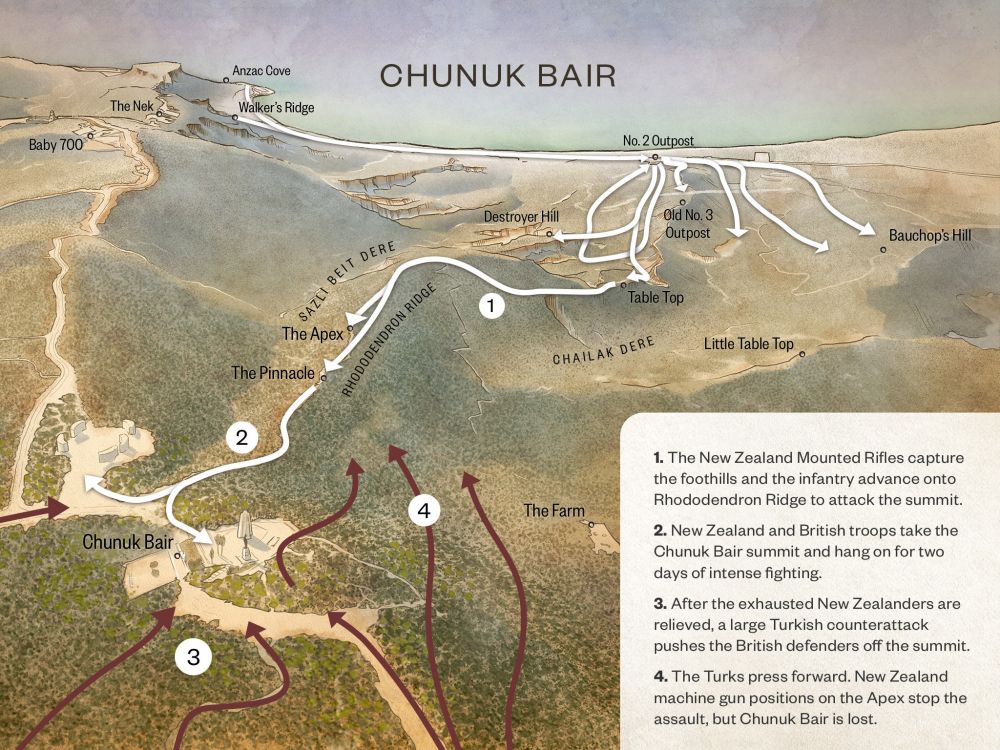
You’re standing on Rhododendron Ridge, just forward of what is known as the Apex. This is where this ridge meets the ridge running through the trees on your left. The junction point is marked by these large tunnels which were dug by the Anzacs after the August offensive. After August 1915, the Apex became the Anzac front line. We’re standing on a ‘Swiss cheese’, because there is a whole matrix of tunnels and underground chambers beneath the surface. If you go down into the bush on the left, you’ll find a whole network of trenches marking the Anzac front line.

At first light on 7 August 1915, Lieutenant-Colonel William Malone’s Wellington Infantry Battalion occupied this ground and the ridge to the left. Malone sent scouts up towards the summit. He was ready to mount an attack to take Chunuk Bair. Early in the morning, before dawn, was a golden opportunity. Malone sent a message to Brigadier General Earl Johnston, commander of the New Zealand Infantry Brigade, telling him where he was, and asked for permission to attack. Johnston hesitated, believing he did not have enough support for an attack, and decided to wait.  

Meanwhile, the Australian Light Horse attacked the Turks at the Nek, in support of the New Zealand advance, and were annihilated. A telephone link was established from General Godley’s headquarters down at the beach to Johnston’s headquarters at the Apex.  

Godley told Johnston to attack at once. If you can imagine the situation here, the Wellingtons were tired men, conscious that their one water bottle was all the water they had. Most men were just sucking on stones to try and keep some moisture in their mouths, and many were suffering from dysentery. It was a battalion of sick, exhausted men, just hanging on, waiting to attack.

Johnston decided that the Wellingtons would stay and hold the ridge. The only other battalion that he could use was the Auckland Infantry Battalion. Their commander, Lieutenant-Colonel Bobby Young, was directed to attack along the line of this track and seize the summit.

Bobby Young did not like the job. By the time his battalion moved up here, it was about 10 am. Artillery and warships were pounding the top of the hill, and once the barrage finished, Young was to attack in broad daylight. He made a recce up the track and immediately came under rifle and shrapnel fire. He turned to Captain Jesse Wallingford, the brigade machine-gun officer, and said, ‘For God’s sake Wallingford get your guns up and cover me, or my men will be cut to pieces’.

But Brigadier-General Johnston wouldn’t wait for Wallingford to bring up the guns. He was anxious for the attack to start and ordered it before the machine guns were in place. The Aucklanders advanced from where you are standing to the next tiny rise about 80–90 metres along the track. In 20 minutes, they were shot to shreds, losing some 300 men.

The wounded lay out all day, moaning in the hot sun, and no one could do anything for them because any movement forward was picked off by Turkish snipers.

Johnston turned to Malone, who commanded his only remaining intact battalion and told him to attack, but Malone refused. And, according to an eye-witness account, there was an argument right about where you’re standing with Malone telling the Brigadier-General that he would attack by night, but would not send his men to commit suicide by day.

How to get here

Getting there

From Table Top continue climbing along the rough track, over a further 50 metre saddle of land leading onto Rhododendron Ridge. Follow the trail further past a number of trenches from the campaign till you come to a dirt road (leading to The Farm Cemetery).

The trail to Chunuk Bair continues on the far side of the road around 15 metres to the south. After a further 500 metre climb, passing the New Zealand position known as The Apex you will come to the openings of some tunnels on the track.

Where to stand

Stop at the partly caved in tunnels, the remnants of a defensive system constructed by New Zealand sappers.

GPS
40°15'6"N
26°18'22"E
Decimal GPS
40.25175
26.3062
  • Looking towards Suvla Bay from The Apex in August 1915
    Looking towards Suvla Bay from The Apex in August 1915Credits

    Looking towards Suvla Bay from The Apex, Gallipoli, Turkey. Hampton, W A, fl 1915 :Photograph album relating to World War I. Ref: 1/2-168814-F. Alexander Turnbull Library, Wellington, New Zealand. http://natlib.govt.nz/records/22346665

  • Trenches were at once dug in new positions. This shows those on Rhododendron Spur a few weeks after it was taken.
    Trenches were at once dug in new positions. This shows those on Rhododendron Spur a few weeks after it was taken.Credits

    Australian War Memorial G01217 http://www.awm.gov.au/collection/G01217/

  • Wellington Infantry at the rear of the Apex beside their dugouts looking down Chailak Dere, 1915
    Wellington Infantry at the rear of the Apex beside their dugouts looking down Chailak Dere, 1915Credits

    National Army Museum, NZ 1991.587 http://nam.recollect.co.nz/nodes/view/1577

  • Advanced Dressing Station near Rhododendron Ridge. Wounded are lying on stretchers ready to be taken to ships waiting out at sea.
    Advanced Dressing Station near Rhododendron Ridge. Wounded are lying on stretchers ready to be taken to ships waiting out at sea.Credits

    National Army Museum, NZ 1992.760 http://nam.recollect.co.nz/nodes/view/5926

  • Members of the Wellington Machine Gun Section at The Apex in August 1915
    Members of the Wellington Machine Gun Section at The Apex in August 1915Credits

    Members of the Wellington Machine Gun Section at The Apex, Gallipoli, Turkey. Hampton, W A, fl 1915 :Photograph album relating to World War I. Ref: 1/2-168725-F. Alexander Turnbull Library, Wellington, New Zealand.http://natlib.govt.nz/records/22792355

Stories & Insights

Basset braved hails of bullets to lay telephone wires and enable battlefield communications.

Chunuk Bair, the easternmost point reached by the New Zealanders on the 8th August 1915.

After the battle of Chunuk Bair, many Anzac men's bodies were left where they lay - their clothes falling away, their bones drying.

New Zealand troops share a pipe in a dugout at the Signalling Station on No 2 Outpost.

Installing and maintaining telephone and telegraph lines at the front was difficult work, and sometimes deadly.

A maori tiki carved into the rock along the main sap to Fisherman's hut. The sign reads : NZ Maori pah and a carved hand pointing to the left indicating the Maori meeting place is to the left. 1915

Māori soldiers yelled Te Rauparaha's famous 'ka mate' haka through the night, as they advanced on Sari Bair.

Shot through the neck, Carkeek knew the only way to reach an anchored hospital ship was crawl down to the beach.

A photo of the Bivvy shared between 9/803 Corporal Curll Alexander Gordon Catto and 9/337 Trooper William Parlane (pictured), No 2 Outpost, Gallipoli.

Every Anzac soldier was needed for the attack on Sari Bair, no matter how sick or exhausted he was.

As the Turks closed in, Surgenor found himself the last man standing in a shallow trench.

Take the next trail

The next Ngā Tapuwae trail is Cape Helles. Proceed to Kilitbahir.
Link to the first stop

Decimal GPS:
70.2781824021454
-18.801583281250032
Sequence:
1
Decimal GPS:
67.08850047908513
-20.669259062500032
Sequence:
2
Decimal GPS:
65.56095822213858
-24.009102812500032
Sequence:
3
Decimal GPS:
62.683967149984994
-57.62726687500009
Sequence:
4
Decimal GPS:
52.47176862422445
-79.29230593750009
Sequence:
5
Decimal GPS:
47.65821020919526
-77.64435671875009
Sequence:
6
Decimal GPS:
45.68384002167691
-80.58869265625009
Sequence:
7

Stop Images

Sequence:
1
Decimal GPS Real Location:
40.252
26.28306
Sequence:
2
Decimal GPS Real Location:
40.25331
26.28891
Sequence:
3
Decimal GPS Real Location:
40.25326
26.29429
Sequence:
4
Decimal GPS Real Location:
40.25175
26.3062
Sequence:
5
Decimal GPS Real Location:
40.25159
26.30762
Sequence:
6
Decimal GPS Real Location:
40.25203
26.30828
Sequence:
7
Decimal GPS Real Location:
40.252
26.30853