5

Crest

Crest https://ngatapuwae.govt.nz/crest Eight hundred Anzacs marched up this hill, packed together, bayonets ready. Ngā Tapuwae Trails /sites/default/files/stop/media/03%20chunuk%20bair%402x.jpg

Eight hundred Anzacs marched up this hill, packed together, bayonets ready.

GALL_Zone3_Loc_SlopeBelowChunukBair_.mp3
Read this story

Crest

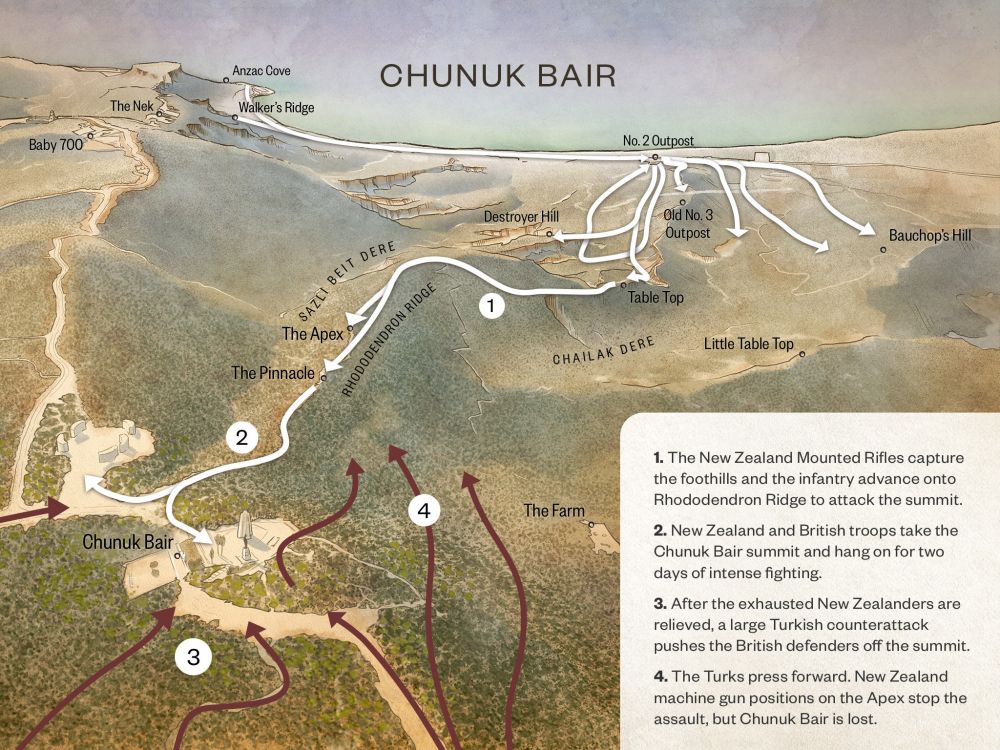
You are just below the crest of Chunuk Bair. If you look back down the track behind you, you can see the Apex where you have walked from. 

At 4.30 in the morning on 8 August 1915, Lieutenant-Colonel William Malone’s Wellington Infantry Battalion lined up at the Apex in a solid mass eight across, and headed for the summit. You can imagine a tightly packed group of 800 men no wider than this track, marching up here with their bayonets fixed. They waited for the artillery fire on the top of the hill to stop, then they attacked. However, the summit was all but deserted.

Half the Wellington Infantry Battalion occupied the Ottoman trench up on the summit. The other half started to dig a reserve trench from where you’re standing, across the track, up to the Turkish memorial that you can see through the trees on your right.

On the top, the Wellingtons almost immediately came under intense Turkish fire. 

If you want to you can pause the audio guide and walk up to the end of this track at the summit. 

Where you now stand, on the summit of Chunuk Bair, was a shallow Turkish trench. Imagine being one of the Wellingtons here, after all the months of fierce fighting. For the first time, they could see their goal of the Narrows of the Dardanelles. If they could hold this high ground it would be an epic victory. 

By the time the Wellingtons reached here, day was dawning. As they started to dig in on the hard stony ground, they were reinforced by two British battalions, which came under heavy fire as they moved up. Jimmy Swan, one of Malone’s scouts, said, ‘The British are coming and the artillery is bowling them over like bees.’ 

The British reinforced the left and the right, but broke and ran when the Turks counterattacked. This battle was largely fought by the Wellington Infantry Battalion. 

By 8 o’clock in the morning on 8 August, Turkish counterattacks, on the trench where you now stand, had wiped out half of the Wellington Infantry Battalion. But the New Zealanders in the support trenches behind hung on. 

The battle for the crest occured right here. It was fierce hand-to-hand fighting with rifle and bayonet. These attacks and counter-attacks continued throughout the day and this crest became no-man’s-land. 

Malone, 57 years old, led the attacks. He was proud that an enemy bullet had bent his bayonet. He looked on it as a lucky charm. Late in the afternoon, the Wellington Infantry Battalion who are 800-strong that morning, were reinforced by 186 Troopers of the Auckland Mounted Rifles, who dribbled in under fierce Turkish fire. By the end of the day there were only 50-odd Wellingtons still able to fight.    

On the slopes behind you, hundreds of wounded New Zealanders and British gathered without medical support, unable to crawl back down the ridge. Some people, like Charlie Clark and Harvey Johns, crawled down the hill and survived, but it took between six and eight hours to get a man down to the beach on a stretcher, and most of the wounded couldn’t move and died here on these slopes in the hot sun.  

At 5 pm Malone was killed near the summit of Chunuk Bair, by New Zealand artillery fire. That night, the Wellington Infantry Battalion was replaced by the Wellington Mounted Rifles and the Otago Infantry Battalion. The next day, the battle was repeated with attack and counterattack, but the New Zealanders still held this ground. 

During the night the New Zealanders were relieved by two British battalions, who were wiped out on the morning of 10 August by a counterattack led by Mustafa Kemal, later known as Atatürk. The summit of Chunuk Bair was lost. 

If there’s an epic New Zealand story, it is the battle that took place right here on Chunuk Bair on 8 and 9 August, 1915.

How to get here

Getting there

From The Apex continue along the track for about 100 metres, which will take you to the Pinnacle, with a walk of another 200 metres bringing you close to the summit.

Where to stand

Stand at the saddle just below the crest of Chunuk Bair. If you look back down the track behind you, you should be able to see raised ground of The Apex, where you have walked from.

GPS
40°15'5"N
26°18'27"E
Decimal GPS
40.25159
26.30762
  • The Wellington Battalion of the New Zealand Infantry Brigade in close combat with Turkish forces on Chunuk Bair.
    The Wellington Battalion of the New Zealand Infantry Brigade in close combat with Turkish forces on Chunuk Bair.Credits

    Brown, Ion G (Major), b 1943?. Brown, Ion G., b 1943? :The battle of Chunuk Bair, 8 August 1915. The sesquicentennial gift to the nation from the New Zealand Defence Force... / I. G. Brown, Major, Army artist. [Wellington, New Zealand Defence Force?, 1990]. Ref: D-001-035. Alexander Turnbull Library, Wellington, New Zealand.http://natlib.govt.nz/records/22805891

  • Wounded soldiers lying on a rise near Anzac Cove, photographed 7 August 1915 
    Wounded soldiers lying on a rise near Anzac Cove, photographed 7 August 1915 Credits

    Wounded soldiers, Gallipoli, Turkey. Denniston, George Gordon, 1885-1958 :Photograph albums relating to World War I including the Gallipoli campaign. Ref: PA1-o-863-03-5. Alexander Turnbull Library, Wellington, New Zealand.http://natlib.govt.nz/records/23217322

  • New Zealand Mounteds charging over the hill to reinforce new Zealand Infantry on Chunuk Bair, August 8th, 1915.
    New Zealand Mounteds charging over the hill to reinforce new Zealand Infantry on Chunuk Bair, August 8th, 1915.Credits

    "The Wellington Regiment (NZEF) 1914 - 1919" By Major General William Henry Cunningham, Lieutenant Colonel Charles Archibald Lawrance Treadwell, and Lieutenant James Sugden Hanna.

  • Soldiers with captured weapons - a Vickers machine gun and a mortar, August 1915
    Soldiers with captured weapons - a Vickers machine gun and a mortar, August 1915Credits

    Soldiers with captured weapons, Gallipoli peninsula, Turkey. Hampton, W A, fl 1915 :Photograph album relating to World War I. Ref: 1/2-168813-F. Alexander Turnbull Library, Wellington, New Zealand. http://natlib.govt.nz/records/22716138

  • Lieutenant William Malone outside his bivouac on Walker's Ridge.
    Lieutenant William Malone outside his bivouac on Walker's Ridge.Credits

    PAColl-10155-2

Stories & Insights

Basset braved hails of bullets to lay telephone wires and enable battlefield communications.

Chunuk Bair, the easternmost point reached by the New Zealanders on the 8th August 1915.

After the battle of Chunuk Bair, many Anzac men's bodies were left where they lay - their clothes falling away, their bones drying.

New Zealand troops share a pipe in a dugout at the Signalling Station on No 2 Outpost.

Installing and maintaining telephone and telegraph lines at the front was difficult work, and sometimes deadly.

A maori tiki carved into the rock along the main sap to Fisherman's hut. The sign reads : NZ Maori pah and a carved hand pointing to the left indicating the Maori meeting place is to the left. 1915

Māori soldiers yelled Te Rauparaha's famous 'ka mate' haka through the night, as they advanced on Sari Bair.

Shot through the neck, Carkeek knew the only way to reach an anchored hospital ship was crawl down to the beach.

A photo of the Bivvy shared between 9/803 Corporal Curll Alexander Gordon Catto and 9/337 Trooper William Parlane (pictured), No 2 Outpost, Gallipoli.

Every Anzac soldier was needed for the attack on Sari Bair, no matter how sick or exhausted he was.

As the Turks closed in, Surgenor found himself the last man standing in a shallow trench.

Take the next trail

The next Ngā Tapuwae trail is Cape Helles. Proceed to Kilitbahir.
Link to the first stop

Decimal GPS:
70.2781824021454
-18.801583281250032
Sequence:
1
Decimal GPS:
67.08850047908513
-20.669259062500032
Sequence:
2
Decimal GPS:
65.56095822213858
-24.009102812500032
Sequence:
3
Decimal GPS:
62.683967149984994
-57.62726687500009
Sequence:
4
Decimal GPS:
52.47176862422445
-79.29230593750009
Sequence:
5
Decimal GPS:
47.65821020919526
-77.64435671875009
Sequence:
6
Decimal GPS:
45.68384002167691
-80.58869265625009
Sequence:
7

Stop Images

Sequence:
1
Decimal GPS Real Location:
40.252
26.28306
Sequence:
2
Decimal GPS Real Location:
40.25331
26.28891
Sequence:
3
Decimal GPS Real Location:
40.25326
26.29429
Sequence:
4
Decimal GPS Real Location:
40.25175
26.3062
Sequence:
5
Decimal GPS Real Location:
40.25159
26.30762
Sequence:
6
Decimal GPS Real Location:
40.25203
26.30828
Sequence:
7
Decimal GPS Real Location:
40.252
26.30853