3

Courtney’s Post

Courtney’s Post https://ngatapuwae.govt.nz/courtneys-post The New Zealand soldiers set up a network of machine guns here and along Second Ridge to protect each post from attack. Ngā Tapuwae Trails /sites/default/files/stop/media/02%20holding%20the%20line%402x.jpg

The New Zealand soldiers set up a network of machine guns here and along Second Ridge to protect each post from attack.

GALL_Zone2_Loc_CournteysPost_48k24bi.mp3
Read this story

Courtney’s Post 

You’re on the edge of Courtney’s Post, which runs along the seaward side of the road. Where you’re standing is similar to Quinn’s Post in that there is a little gully, which they terraced, where the men lived. You’re standing in what were the frontline trenches. If you go into the bush to your left, you can see some of those trenches. But be careful: you’ll find that about 10–15 metres in there, there’s a sheer drop down into Monash Gully. 

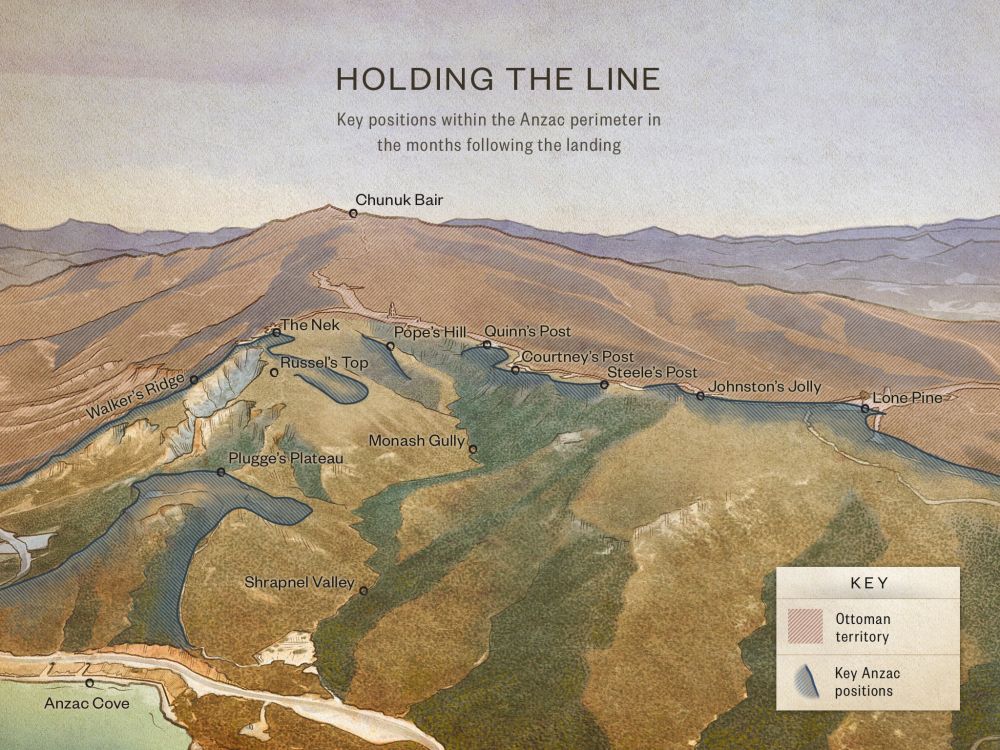
Courtney’s Post was critically important because the machine guns that were here were sighted to fire in front of Quinn’s Post, preventing any attempt by the Ottomans to attack it from the east. Quinn’s was also protected by machine guns at Pope’s Hill and Russell’s Top. 

New Zealand and Australian machine guns were set up here by Captain John Rose of the New Zealand Staff Corps, along with Captain Jesse Wallingford, who was the New Zealand Infantry Brigade machine gun officer. They worked out a system of interlocking machine gun arcs so that any enemy attempt to charge on Quinn’s Post would be mown down by these machine guns. 

Steele’s Post protected this post on the southern side. All along the front line, Australians and New Zealanders protected each other. Courtney’s and Steele’s posts were very important because they were the only part of the Anzac line that overlooked the Ottoman trenches, but at the same time they were overlooked from the high ground to the north.

These posts protected the top of Monash Valley. If the Ottomans controlled that valley, it would be the end of the entire Anzac perimeter. 

Turkish machine-gun fire could sweep down over where we’re standing. Anyone who popped their head up here would be killed. The best way to fight in the trench here was to use a periscope rifle, which was a contraption that you could fire from the safety of a trench. 

By taking mirrors stolen from the ships offshore, the Anzacs could fire accurately up to 300 metres, without raising their heads above the trench. By using periscopes and periscope rifles, the Anzac troops managed to keep the Ottomans at bay.

How to get here

Getting there

WARNING: Many locations at Gallipoli are potentially dangerous, and there are undercut cliffs and sudden drops. Go slowly and carefully - and never stand close to a cliff's edge.

From Johnston's Jolly Cemetery continue north along the road, passing Courtney's and Steel's Post Cemetery, and carry on a short distance until you come to a sign at the left side of the road that says 'Courtney's Post'.

Where to stand

Stand on the verge facing the Courtney's Post road sign. Make sure you can see the Quinn's Post Cemetery memorial cross just to the north further along the ridge. 

GPS
40°13'48"N
26°17'15"E
Decimal GPS
40.23018
26.28766
  • Terraces at Courtneys Post in June 1915
    Terraces at Courtneys Post in June 1915Credits

    Courtneys Post, Gallipoli, Turkey, during World War I. Bould, Graham Brooks, 1945- :Photographs. Ref: 1/2-103895-F. Alexander Turnbull Library, Wellington, New Zealand.http://natlib.govt.nz/records/22501252

  • Robert Cardno poses with a machine gun. There is a periscope to the left of the gun.
    Robert Cardno poses with a machine gun. There is a periscope to the left of the gun.Credits

    2001.215 National Army Museum, NZ

  • Soldiers enjoying a meal.
    Soldiers enjoying a meal. Credits

    National Army Museum NAM 1992-742

  • Soldiers ready for action.
    Soldiers ready for action.Credits

    National Army Museum, NZ 2007-550 

  • Quinn’s Post is left of centre, and Courtney’s on the right. The resting quarters for the soldiers are in the foreground.
    Quinn’s Post is left of centre, and Courtney’s on the right. The resting quarters for the soldiers are in the foreground.Credits

    Looking towards Quinn's Post, Gallipoli, Turkey. Powles family :Photographs. Ref: PA1-o-811-14-3. Alexander Turnbull Library, Wellington, New Zealand.http://natlib.govt.nz/records/22903456

Stories & Insights

Fenwick kept diaries throughout the Gallipoli campaign, describing appalling sights in graphic detail.

Officers of Wellington Company share meal

The Anzacs were crammed together in trenches, many of them sick, living on food that was often barely edible - yet they coped.

Lieutenant A J Shout sniping with a periscope rifle, 1915.

From jam-tin bombs to periscope rifles, the Anzacs' inventiveness knew no bounds.

Malthus described the desperate and dangerous conditions at the notorious Quinn’s Post.

Clear-headed and disciplined, Malone was determined to improve living conditions for the men in the trenches. 

Major Kemal Ohri is led by the hand along the beach by two officers from Anzac headquarters as an envoy to negotiate an armistice to bury the dead.

After a horrific battle, rotting bodies lay everywhere in the no-man's land betwen trenches. Both sides agreed on a ceasefire to clean up.

An Australian soldier firing a Vickers .303 machine gun on Turkish positions. Lit by sunlight through the observation hole at right, the post one of many in the extensive array of tunnels connecting the Australian front line positions.

Both sides dug underground tunnels towards each other. It let them listen in to their enemy and lay hidden explosives.

Take the next trail

The next Ngā Tapuwae trail is Chunuk Bair. Proceed to No 2 Outpost.
Link to the first stop

Decimal GPS:
74.51234869995749
-76.32464468750004
Sequence:
1
Decimal GPS:
74.64527866338169
-89.31048453125004
Sequence:
2
Decimal GPS:
75.08725557577952
-101.21966421875004
Sequence:
3
Decimal GPS:
75.35894441520114
-102.09857046875004
Sequence:
4
Decimal GPS:
75.4684211203972
-103.46087515625004
Sequence:
5
Decimal GPS:
75.78788290096271
-117.06194937500004
Sequence:
6
Decimal GPS:
75.45919210986763
-117.63323843750004
Sequence:
7
Decimal GPS:
75.51370929597266
-118.84173453125004
Sequence:
8
Decimal GPS:
76.41021976105979
-111.54681265625004
Sequence:
9

Stop Images

Sequence:
1
Decimal GPS Real Location:
40.23018
26.28766
Sequence:
2
Decimal GPS Real Location:
40.23291
26.28721
Sequence:
3
Decimal GPS Real Location:
40.23018
26.28766
Sequence:
4
Decimal GPS Real Location:
40.23833
26.29188
Sequence:
5
Decimal GPS Real Location:
40.23817
26.29141
Sequence:
6
Decimal GPS Real Location:
40.24226
26.28995
Sequence:
7
Decimal GPS Real Location:
40.24133
26.28818
Sequence:
8
Decimal GPS Real Location:
40.24168
26.28827
Sequence:
9
Decimal GPS Real Location:
40.24289
26.29462