9

Baby 700

Baby 700 https://ngatapuwae.govt.nz/baby-700 On the first day of the Gallipoli campaign, the most important battle was for this hill. Ngā Tapuwae Trails /sites/default/files/stop/media/02%20holding%20the%20line%402x.jpg

On the first day of the Gallipoli campaign, the most important battle was for this hill.

GALL_Zone2_Loc_Baby700_48k24bit_2015.mp3
Read this story

Baby 700

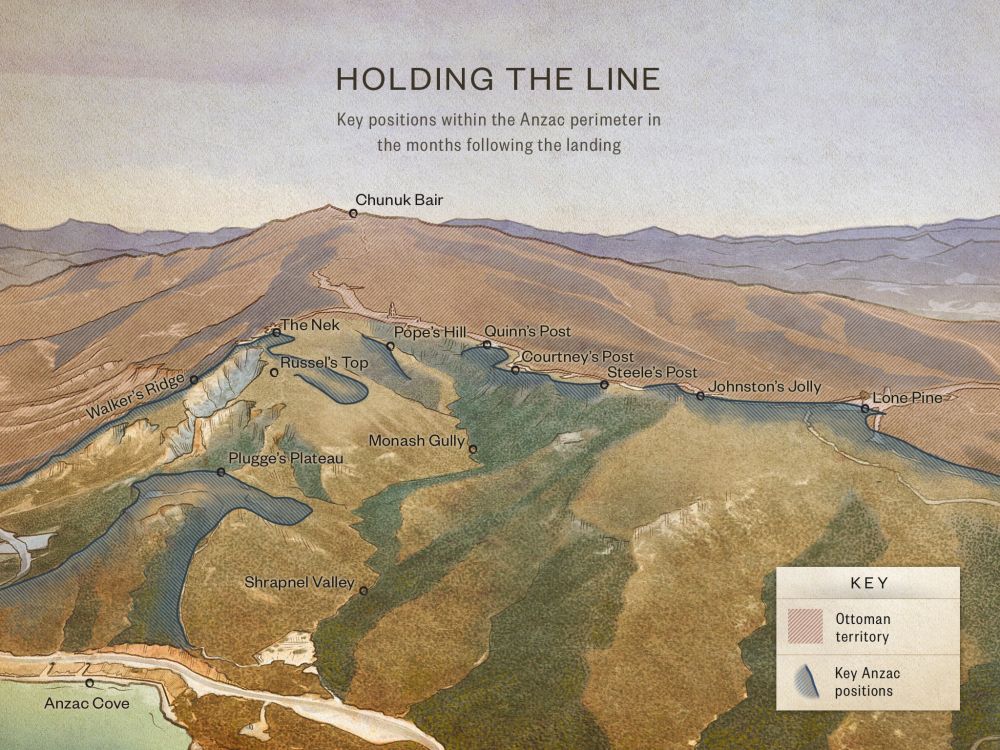
You are standing on the hill Baby 700. This is where the most important battle was fought on 25 April 1915. Look to your right, and see the flag in the distance in the gap in the trees. That’s Chunuk Bair. 

Just forward of where you’re standing, you can see that it starts to go downhill into a little gully before climbing up on to the next hill, which is known as Battleship Hill. It is in this gully where the infantrymen of the Auckland Battalion, led by a young Spencer Westmacott, linked up with the Australians on the left of the line on 25 April. 

The New Zealanders were down in that gully in scrub like you see now. There were no pine trees, but this low scrub is typical of the vegetation in 1915. We were looking for the Australians and we found them on these forward slopes, but by that stage they were shot to pieces.

Almost all of the Australians had been killed or wounded because, at this time, coming down these slopes was the counterattacking Turkish 57th Regiment. That large, pyramid-shaped structure, with a flag that you can see behind you, is the memorial to that Turkish regiment.  

Westmacott and his men went into the line here and were reinforced by other members of the Auckland Infantry Battalion. At the same time, the soldiers of the Canterbury Infantry Battalion under their commanding officer, Colonel McBean Stewart, were on the other side of the hill on the seaward slope. They were also coming to reinforce the Australians. This was the battle for Baby 700 on the afternoon of 25 April. 

The Turkish commander, Mustafa Kemal, later known as Atatürk, was on Chunuk Bair. He pushed his 57th Regiment down towards where you are standing in order to push the New Zealanders off. The Turkish snipers just shot them to pieces, and there was a seesaw battle. The New Zealanders held it, were driven back, counterattacked, were driven back again, counterattacked – this happened five times. And then, finally, the New Zealanders were driven off Baby 700.

In the late afternoon, Mustafa Kemal’s 57th Regiment seized this hill, and small parties of Australians and New Zealanders ended up in Quinn’s Post and at the Nek. And it’s those two areas that became established as the Anzac frontline for the next nine months. 

The Anzacs tried to take back Baby 700 in a major night attack on 2 May, but again failed to take the seemingly impregnable position.

How to get here

Getting there

From Walker's Ridge Cemetery return to your car at The Nek Cemetery car park, then drive back to the fork in the road, turning left at the junction. After 100 metres, there is a small signposted path on the right leading to Baby 700 Cemetery.

Where to stand

Walk along the path into Baby 700 Cemetery, and go to the far right corner (to the right of the memorial cross). Look for the Turkish flag on th horizon, and face in that direction.

GPS
40°14'34"N
26°17'40"E
Decimal GPS
40.24289
26.29462
  • One of several machine gun positions on Baby 700 which covered the Nek. The one shown has been covered, to the left is the access point to the trench.  1919
    One of several machine gun positions on Baby 700 which covered the Nek. The one shown has been covered, to the left is the access point to the trench. 1919Credits

    Australian War Memorial G01876 http://www.awm.gov.au/collection/G01876/

  • Bones and equipment of soldiers on Baby 700, looking towards Battleship Hill in early 1919.
    Bones and equipment of soldiers on Baby 700, looking towards Battleship Hill in early 1919.Credits

    Australian War Memorial G01885 http://www.awm.gov.au/collection/G01885/

  • The view across the Nek from the Australian trenches to Baby 700 in 1919. A Turkish monument is in the background. 
    The view across the Nek from the Australian trenches to Baby 700 in 1919. A Turkish monument is in the background. Credits

    Australian War Memorial G02013A http://www.awm.gov.au/collection/G02013A/

  • An aerial view of the Chessboard area showing Quinn's Post, Turkish Quinn's and Mortar Ridge.
    An aerial view of the Chessboard area showing Quinn's Post, Turkish Quinn's and Mortar Ridge.Credits

    Australian War Memorial A02094 http://www.awm.gov.au/collection/A02094/

  • The view from the machine gun positions on Baby 700 in 1919. The Turkish monument is in the right background. 
    The view from the machine gun positions on Baby 700 in 1919. The Turkish monument is in the right background. Credits

    Australian War Memorial G01877 http://www.awm.gov.au/collection/G01877/

Stories & Insights

Fenwick kept diaries throughout the Gallipoli campaign, describing appalling sights in graphic detail.

Officers of Wellington Company share meal

The Anzacs were crammed together in trenches, many of them sick, living on food that was often barely edible - yet they coped.

Lieutenant A J Shout sniping with a periscope rifle, 1915.

From jam-tin bombs to periscope rifles, the Anzacs' inventiveness knew no bounds.

Malthus described the desperate and dangerous conditions at the notorious Quinn’s Post.

Clear-headed and disciplined, Malone was determined to improve living conditions for the men in the trenches. 

Major Kemal Ohri is led by the hand along the beach by two officers from Anzac headquarters as an envoy to negotiate an armistice to bury the dead.

After a horrific battle, rotting bodies lay everywhere in the no-man's land betwen trenches. Both sides agreed on a ceasefire to clean up.

An Australian soldier firing a Vickers .303 machine gun on Turkish positions. Lit by sunlight through the observation hole at right, the post one of many in the extensive array of tunnels connecting the Australian front line positions.

Both sides dug underground tunnels towards each other. It let them listen in to their enemy and lay hidden explosives.

Take the next trail

The next Ngā Tapuwae trail is Chunuk Bair. Proceed to No 2 Outpost.
Link to the first stop

Decimal GPS:
74.51234869995749
-76.32464468750004
Sequence:
1
Decimal GPS:
74.64527866338169
-89.31048453125004
Sequence:
2
Decimal GPS:
75.08725557577952
-101.21966421875004
Sequence:
3
Decimal GPS:
75.35894441520114
-102.09857046875004
Sequence:
4
Decimal GPS:
75.4684211203972
-103.46087515625004
Sequence:
5
Decimal GPS:
75.78788290096271
-117.06194937500004
Sequence:
6
Decimal GPS:
75.45919210986763
-117.63323843750004
Sequence:
7
Decimal GPS:
75.51370929597266
-118.84173453125004
Sequence:
8
Decimal GPS:
76.41021976105979
-111.54681265625004
Sequence:
9

Stop Images

Sequence:
1
Decimal GPS Real Location:
40.23018
26.28766
Sequence:
2
Decimal GPS Real Location:
40.23291
26.28721
Sequence:
3
Decimal GPS Real Location:
40.23018
26.28766
Sequence:
4
Decimal GPS Real Location:
40.23833
26.29188
Sequence:
5
Decimal GPS Real Location:
40.23817
26.29141
Sequence:
6
Decimal GPS Real Location:
40.24226
26.28995
Sequence:
7
Decimal GPS Real Location:
40.24133
26.28818
Sequence:
8
Decimal GPS Real Location:
40.24168
26.28827
Sequence:
9
Decimal GPS Real Location:
40.24289
26.29462