New Zealand Memorial
You’re standing at the New Zealand Monument to the Battle of the Somme, 1916, at Longueval. If you look back down the road you’ve driven up - into the village of Longueval, you can see a ridgeline extending to your right, along to Caterpillar Valley Cemetery. This is where the New Zealand Memorial to the Missing is located, and it is where the New Zealand Unknown Warrior was originally buried, before his removal to New Zealand. Between you and the cemetery is Caterpillar Valley itself. On your the left is Devil’s Wood or Delville Wood - and on your right is High Wood, both of them shattered stumps by 1916.
This area stretching back into the distance to the skyline marked the advance by the British armies from the opening of the battle of the Somme on 1 July. It took from July through to September to reach these front trenches because the Germans contested every inch of ground. It became a bloody battle of attrition and finally, at the end of August, General Haig regrouped his forces. Haig’s plan here was to use the 4th Army commanded by General Rawlinson to break through in a bold attack.
Haig had an ace up his sleeve - he brought in new divisions, including New Zealand, and he also brought in 50 tanks - the new secret weapon. The tanks were an experimental weapon, never before used in combat, and now he was going to use them as a surprise. Not only was this attack the New Zealand Division’s first attack, but it was going to be the first time that infantry attacked with tanks in the history of warfare.
This is also the site of the German Crest line trench, which was the first objective for the New Zealanders. If you look back down to where the road dips out of sight - that’s the approximate area of the New Zealand frontline, with the Aucklanders on the left of the road, and the Otagos on the right. On the night of 14 September they were waiting to attack.
The country all round here is properly churned up by shell fire, and High Wood is no wood at all, just a mass of splinters and broken down trees, and full of gruesome sights, which I won’t bother to disturb your sleep with accounts of...There is also a mine crater in this wood, and to give you a small idea of its size, the NZ Division with all its equipment could be buried in it and leave plenty of room.
James Holmes
The plan was for the British 41st Division on your left to attack from Delville Wood, heading toward the village of Flers. While on your right the 47th Division would capture High Wood. The British, on both flanks, had to keep up with the Otagos and the Aucklanders - and vice versa.
At 6.20 on the morning of 15 September, the British began their enormous artillery barrage, which included four brigades of New Zealand artillery. As the men went over the top - imagine them coming up in four waves towards you, carrying all of their heavy kit. They wouldn’t have been able to hear a thing - let alone yell to each other, with the deafening roar of artillery firing and crashing ahead of them. As they approached where you stand, and the artillery barrage lifted, the Germans, who had been sheltering, would have looked up and seen the New Zealanders charging straight at them.
On this right flank closest to High Wood, the 47th Division hadn’t been able to break through the wood and the Germans on the edge of this position opened up with their machine guns against the Otagos and mowed them down. Sergeants Brown and Rodgers headed for the edge of the wood and fought their way in, knocking out two machine gun posts. At the same time Private Dick Travis killed some German snipers on the edge of the wood, allowing the Otagos to move on, take the Crest and then move down the slope into Switch trench roughly 100 metres behind you. Brown would receive a VC for this action, and his actions on 1 October, Travis the Distinguished Conduct Medal, and Rodgers a Military Medal. All three were to die on the Western Front.
The casualties were high for the Otagos, at about 50 percent, which is a huge amount out of the 800 men that were involved in the attack. If you turn around now, and face the direction of the New Zealanders’ attack, it was here, the Aucklanders took their part of the Crest line trench and then pushed on down to Switch trench a few hundred metres ahead of you. The Germans, holding these positions, broke and ran, and the New Zealanders shot at them as they fled.
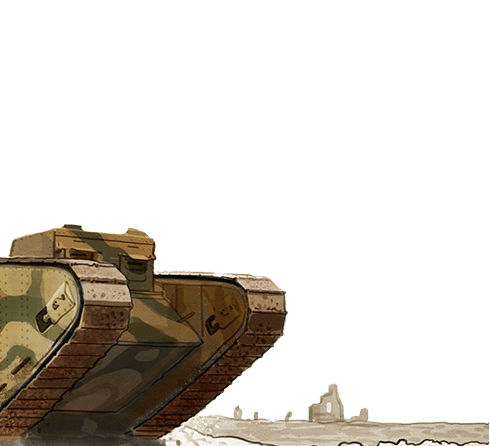
The New Zealanders then dug in, and the creeping barrage now moved forward, followed by the leading battalion of the Rifle Brigade. They were held up by a very strong defensive line which runs across your front between you and the village of Flers on your right. This was the Flers line - and it was protected by barbed wire entanglements. It’s now that the tanks – nicknamed ‘caterpillars’ - that were in support of the New Zealand Division come into their own.
Past me and over Death Valley en route to Flers went the queerest caterpillars ... silent except for the clucking engines in their bowels, one could hardly resist bursting into laughter... The most wonderful thing about them is the mode in which they are constructed, so as to overcome the ordinary difficulties of locomotion over broken or shell pitted ground...and it is a great pity that we haven’t a few thousand of them.
Gaetano Fama
The tanks, His Majesty’s Landships D 11 and D 12, cleared a path through the barbed wire and knocked down the walls of buildings holding the German defenders, allowing the New Zealand riflemen to fight their way in and help the 41st Division secure Flers.
Then at last came two caterpillars that had crawled over the ridge and lumbered slowly down the slope across a wilderness of shell-holes. A rain of bullets glanced harmlessly from their iron sides. They lurched up against the rusty masses of wire, their blunt snouts rising high and then crashing down from the height, smashed and flattened the obstacle and rolled on toward the enemy line. The Germans, helpless before these new dragons of war, ceased firing in terror. Some put their hands up; some ran.
Ormond Burton
By midday, on 15 September, the New Zealanders were close to their final objective, near Factory Corner, just beyond Flers. At this stage, they were a hodge-podge of every New Zealand battalion, all under the command of Captain Lindsay Inglis of the Rifle Brigade. But the casualties had been mounting, with about 2,000 New Zealand dead and wounded by the end of the day. More German defences were in front of them and the fighting was far from over.
The next day, 16 September, the skies opened up and rain turned the battlefield into a muddy morass. Over the next 23 days the New Zealanders engaged the Germans in a series of small scale battles, slowly forcing them back despite determined resistance and constant counter-attacks.
And Lord, the mud, it was over our boot tops, there was no ‘bivvie’ to sleep in, so it was just a case of sleeping standing up. The old trench started to fall in on the sides, Hell, it was the limit. Then our rations and water went astray, I never craved for a drink of water like I did in this trench, tucker we could do without, but water, no.
John Fraser
Haig did not achieve his breakthrough, and finally, winter forced him to close the battle down. The New Zealanders had been successful, but at great cost. Casualties had risen to 7,500 by the time the division was relieved on 2 and 3 October.
So the New Zealanders finished their part in the Third Battle of the Somme. Russell was determined to learn the lessons of the Somme and his task was to rebuild his division so it could effectively take part in future operations. Now the New Zealand Division returned to where they started, at Armentières, their old nursery area - and they prepared for whatever 1917 might bring.