Grévillers Cemetery
You’re standing in the Commonwealth War Graves Cemetery at Grévillers. If you look around to the end of the cemetery, there is the New Zealand Memorial to the Missing. The memorial remembers those who died in the Battle of Bapaume and have no known graves. There are some 450 names there.
Much of the fighting of the New Zealand Division in 1918 will be covered here first, in a defensive role, from March to June and then, as they go on the offensive, chasing the Germans back and attacking Bapaume. Here at Grevillers is where they launched this very attack.
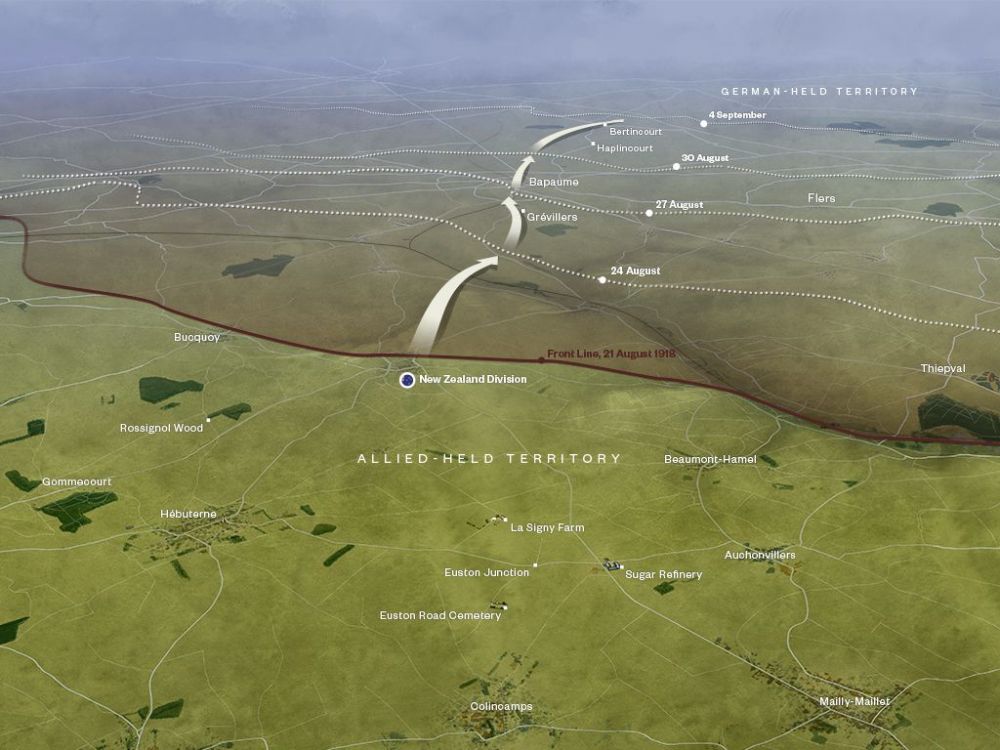
In March 1918, the New Zealanders were sent back down to the Somme, and they helped hold back the massive German advance, across a sprawling 55 kilometre-wide front. They then consolidated their defensive line, and, alongside the British and Australians, helped stop the Germans from taking the key communications centre - the city of Amiens.
The Germans had exhausted themselves, and the elite of their soldiers and stormtroopers had been destroyed in battles leading up to and on this defensive line. This had a serious impact on the morale of the German armies because they knew - that this was their big shot - their chance to break through, and separate the British and French armies, and they had failed.
They became aware of the huge resources that the Allied armies had to draw upon to continue fighting, something which the German Army no longer had. Now, in August, the Supreme Allied Commander, Marshal Foch, realised, after throwing the Germans back on the Marne - that the enemy were weak. He ordered a series of offensives all along the front to sound out the strength of the German defensive system, and to put pressure on their armies. Rawlinson’s 4th Army mounted a major offensive at Amiens, involving the Australians, Canadians and British - and it was a staggering success. The Germans were pushed back - and this signalled to the Allies that more offensives should be mounted immediately.
The place was a shambles of German troops… All this garrison…[had been] cut to pieces before or after death. Their bodies or their fragments lay in every shape and shapelessness of death, in puddles of broken trenches or on the edge of deep ponds in shell craters.
Philip Gibbs
And so the attention shifted, and now General Byng’s 3rd Army, which included the New Zealand Division, was told to mount a similar offensive on Bapaume. Bapaume was a key communications centre and so it was vital in destabilising the German’s logistic network.
All along the front Haig was looking at starting a series of attacks to throw the Germans off balance. One attack alone soon ran out of steam and would stall, and as wounded were treated, and supplies and artillery were brought forward, the attack would simply peter out. But Haig, in keeping with Foch’s plan, wanted to punch the German lines with sequential attacks, hitting them at numerous points all along their front, throwing their army into disarray.
The village of Grévillers is behind you, easily located by the church spire. Looking at the countryside, you notice the rolling landscape and the crests of those small hills. Picture German machine guns up on those crests, and if you were advancing, for example, through this cemetery, those machine guns on each flank, would cut you down, and stop you cold.
“The last quarter mile was across a valley with enemy machine guns each end going at us. The wire [that we were laying] ran out in the centre and we had to lie stretched out in the mud to join it up. The bullets were sweeping over us so we crawled to a shell hole but it was full of gas and made us very crook. Two officers were forward out of danger + signalled to us to make a dash for it. As they signalled I answered with a wave of my hand and each time Fritz tried to hit it.”
Dudley Jeune
This was the problem that the New Zealanders faced attacking from this position, as they planned not to take Bapaume head on, but to encircle it. The two critical obstacles were Loupart Wood, which is out of sight, behind the village of Grévillers and Grévillers itself. The 1st Wellingtons had the job of taking Loupart Wood, and the 2nd Aucklands were to take Grévillers.
The Wellingtons fought their way in, but it took them eight hours of difficult fighting against small groups of stubborn German defenders. All of this area was part of the old 1916 defences so it was crisscrossed with old trench systems, and the Germans were well dug in.
Allied tanks rolled in, supporting the Wellingtons, but they couldn’t get into the Wood itself, so it became an infantry battle, with bitter hand to hand fighting. Loupart Wood was finally taken by the Wellingtons on 24 August 1918. Meanwhile, the Aucklands had headed towards the village, with a long approach in the early, misty morning. At first light, they started fighting their way around each side of the village.
"...we went over the top at 7.00a.m. but did not get very far for we were opposed by a great number of machine guns, so we dug in in a shallow trench.”
Jesse Stayte
General Russell’s philosophy was simple: ‘villages are only obstacles, not ends in themselves.’ So get around them, make it obvious to the Germans they’d been encircled, and then when they pull out, they’ll be shot down or they’ll quickly surrender.
“We got two prisoners and some machine guns and had a lot of men wounded and one killed. In this trench we found dozens of Fritz Rifles leaning against the side and also their packs all ready for moving, and yet all were left behind, suggesting a very hasty retreat.”
Jesse Stayte
The companies moved around the flanks, and a supporting company started fighting through the village - the village to the north of you, Biefvilliers, stood on rising ground, and as the New Zealanders came around this side they came under intensive fire and were pinned down.
It was in this fighting that Sergeant Sam Forsyth, an Engineer, attached to the 2nd Aucklands, and a 1914 veteran - proved his worth. Forsyth saw two of the supporting tanks nearby, so he crossed over to them, under fire, and was wounded. He led the tank up through that same fire so it could suppress the German machine guns, but it was hit, and knocked-out by a German Anti-tank gun. Forsyth then got the tank crew, and some of his men, and they regrouped behind the wrecked tank, and then charged forward and took out the machine guns that were holding them up.
Grévillers was secured. Forsyth positioned his platoon on the high ground, but it was quite clear that they were not going to go any further forward, because all these villages around you, were strongpoints and the Germans had every intention of hanging on grimly to Bapaume. Forsyth was then shot and killed by a sniper as he attempted to consolidate his platoons’ defences.
Over the following days there was heavy fighting as the New Zealanders pushed around to the north of Bapaume. It’s in this fighting that several Victoria Crosses were won, and this is where Sergeant Stanley Judson, who had already won a Distinguished Conduct Medal and a Military Medal, now wins a VC. Attacking an enemy trench he jumped up on the parapet, raced after the retreating Germans, and demanded their surrender. When they returned fire, he threw a grenade among them, and then jumped down, shooting and killing more Germans as he went, and captured their two machine guns, while the rest fled.
It was an amazing feat to win a Victoria Cross, a Dinstinguished Conduct Medal and a Military Medal in the space of six weeks.
The Germans resisted at Bapaume until the night of 28 August, when they retreated, leaving the town. The New Zealanders entered Bapaume the next day and continued to push the Germans back, chasing them until halting near Bertincourt to regroup. What you see here at Bapaume are some of the Gallipoli veterans who were privates in 1915, and who are now sergeants or lieutenants - having earned their stripes and promotions through hard work and leadership. By 1918, they’re battle-hardened, and they’re the ones who lead the way with their fighting skills and experience.
If you look at the names of these 151 men who are buried in this cemetery, or the 450 that are on the memorial, many of them were the hard-core of experienced soldiers that made up the backbone of the New Zealand Division. This is what made the New Zealand Division such an excellent fighting force in these final battles in 1918.


 in Berlin.")