1

Lone Pine

Lone Pine https://ngatapuwae.govt.nz/gallipoli/holding-the-line Many Australians and Turks lost their lives here, in some of the bloodiest close-quarters fighting of the campaign. Ngā Tapuwae Trails /sites/default/files/stop/media/02%20holding%20the%20line%402x.jpg

Many Australians and Turks lost their lives here, in some of the bloodiest close-quarters fighting of the campaign.

GALL_Zone2_Loc_LonePine_48k24bit_201.mp3
Read this story

Lone Pine

Lone Pine is famous for the Australian attack that began on 6 August 1915, and the ferocious fighting that took place over subsequent days. There were thousands of Australian and Ottoman casualties, seven Victoria Crosses were awarded – one to New Zealand-born Captain Alfred Shout.

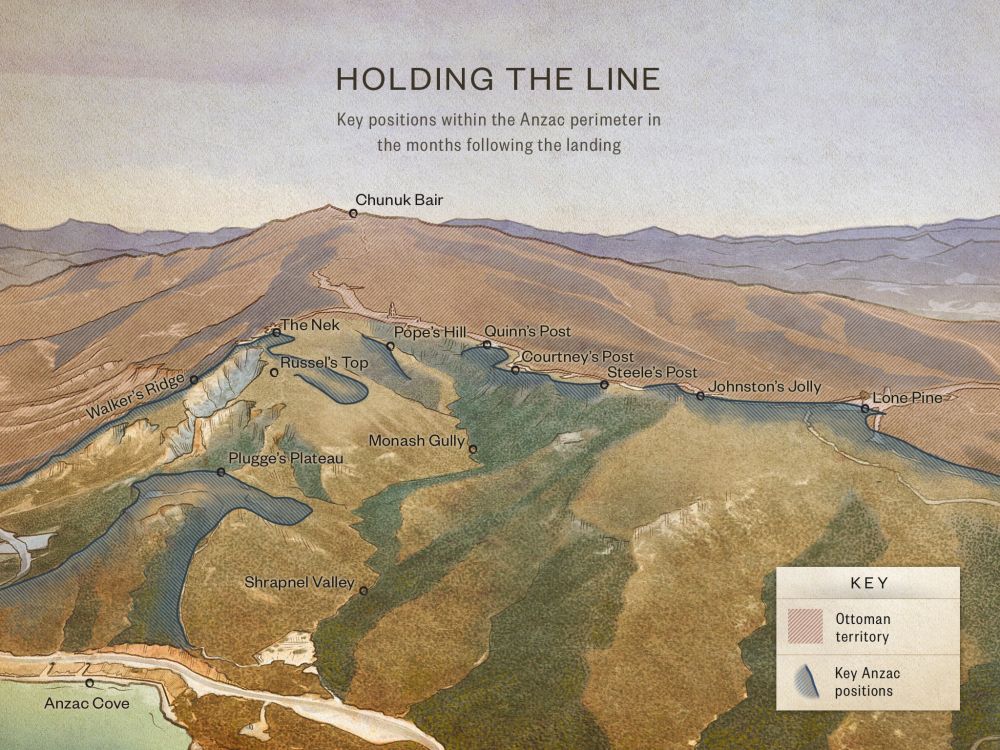
This land was taken by the Australians on 25 April 1915, but they lost it almost immediately. They were driven back to the line of trees on the edge of the cemetery. That became the Australian front line until the August offensive.

The aim of this offensive was to take Chunuk Bair and the other high points on the Sari Bair range. A series of secondary attacks along Second Ridge would draw the Ottoman Army’s attention away from these high points. The largest attack would be here at Lone Pine.

The Australians dug a series of underground trenches as close as possible to the Ottoman front line, which was just short of the lone pine tree. These underground trenches were dug just below the ground, so that you could break them open, jump out and run at the enemy. In fact, they called them wombat holes. 

Covered by British and New Zealand artillery, the Australians broke out of their underground trenches. They raced forward and were initially surprised because they didn’t expect the Ottoman front trenches to be timbered over. 
But the artillery had created enough holes so that some soldiers could drop through them, while others ran to the support trenches at the far end of the cemetery, which hadn’t been covered over. These soldiers jumped in and fought their way back. 

Over the next few days, this became a bloody battle of attrition –beneath where you are  standing. Some of the fighting was the bloodiest of the entire Gallipoli campaign. 

A New Zealander, Bombardier Arthur Currey, described working his way forward: the place was clogged with the dead, and it was obvious men were killed face to face, bayonet to bayonet. 

The Australian attack was successful in drawing attention away from the high ground, but it was at a massive cost.

The panels in front of the monument represent Australians who have no known graves. If you look at the sides of the monument, you will see the names of the New Zealanders who went missing between April and August, or who were buried at sea during the campaign. 

How to get here

Getting there

From Ari Burnu retrace you path along the coastal road, heading south towards Gaba Tepe, the headland 2.5 km to the south of Anzac Cove. Take the first paved road to the left, signposted for Chunuk Bair (the Conkbayiri road).

This road is one-way, though there is the chance you could meet oncoming traffic because some drivers don't follow these rules. After a drive of some 2 km climbing past a number of Turkish monuments along the way you come to Lone Pine Cemetery on the left of the road.

Where to stand

Walk through Lone Pine Cemetery, and go up the right-hand steps in front of the monument. At the top, turn around and face west towards the pine in the centre of the cemetery.

GPS
40°13'48"N
26°17'15"E
Decimal GPS
40.23018
26.28766
  • Three unidentified soldiers standing at the old Turkish firing line in Lone Pine. Note the pine logs remaining from the original trench headcover.
    Three unidentified soldiers standing at the old Turkish firing line in Lone Pine. Note the pine logs remaining from the original trench headcover.Credits

    Australian War Memorial C01929 http://www.awm.gov.au/collection/C01929/

  • The silhouette of a soldier by the opening of a 200-yard long tunnel leading to Lone Pine, 1915.
    The silhouette of a soldier by the opening of a 200-yard long tunnel leading to Lone Pine, 1915.Credits

    Australian War Memorial C01478 http://www.awm.gov.au/collection/C01478/

  • The bodies of Australian soldiers in and above Southern Trench at Lone Pine. Two survivors of the battle are pressed closely to the left wall.
    The bodies of Australian soldiers in and above Southern Trench at Lone Pine. Two survivors of the battle are pressed closely to the left wall.Credits

    Australian War Memorial A04029 http://www.awm.gov.au/collection/A04029/

  • These two images show a panorama of the aftermath of the August attack at Lone Pine.
    These two images show a panorama of the aftermath of the August attack at Lone Pine.Credits

    Australian War Memorial C01685 http://www.awm.gov.au/collection/C01685/

  • Looking back from Lone Pine to where the attack commenced. Two corpses are lying in the foreground amid debris and barbed wire.
    Looking back from Lone Pine to where the attack commenced. Two corpses are lying in the foreground amid debris and barbed wire.Credits

    Australian War Memorial C01727 http://www.awm.gov.au/collection/C01727/

Stories & Insights

Fenwick kept diaries throughout the Gallipoli campaign, describing appalling sights in graphic detail.

Officers of Wellington Company share meal

The Anzacs were crammed together in trenches, many of them sick, living on food that was often barely edible - yet they coped.

Lieutenant A J Shout sniping with a periscope rifle, 1915.

From jam-tin bombs to periscope rifles, the Anzacs' inventiveness knew no bounds.

Malthus described the desperate and dangerous conditions at the notorious Quinn’s Post.

Clear-headed and disciplined, Malone was determined to improve living conditions for the men in the trenches. 

Major Kemal Ohri is led by the hand along the beach by two officers from Anzac headquarters as an envoy to negotiate an armistice to bury the dead.

After a horrific battle, rotting bodies lay everywhere in the no-man's land betwen trenches. Both sides agreed on a ceasefire to clean up.

An Australian soldier firing a Vickers .303 machine gun on Turkish positions. Lit by sunlight through the observation hole at right, the post one of many in the extensive array of tunnels connecting the Australian front line positions.

Both sides dug underground tunnels towards each other. It let them listen in to their enemy and lay hidden explosives.

Taking the Holding the Line trail

WARNING: Many locations at Gallipoli are potentially dangerous, and there are undercut cliffs and sudden drops. Go slowly and carefully - and never stand close to a cliff's edge.

Get to Lone Pine (the start of this trail) from Eceabat

From the ferry wharf in Eceabat, turn left and follow the road along the Dardanelles coast 200 metres before it turns right, looping around the back of the town. Follow this road north for two kms until you reach the roundabout near the coast, signposted for Anzak Koyu (Anzac Cove). Turn left and drive 6 kms across the peninsula. Take the road signposted for Chunuk Bair (the Conkbayiri road). This road is one-way, though there is the chance you could meet oncoming traffic because some drivers don’t follow these rules. After a drive of some 2 km climbing past a number of Turkish monuments along the way you come to Lone Pine Cemetery on the left of the road.

Your stop

Walk through Lone Pine Cemetery, and go up the right-hand steps of the monument. At the top, turn right, then turn and face the cemetery.

Get to the must-do stop from Eceabat

Follow the directions to Lone Pine Cemetery and keep going for around 4kms until you reach Quinn’s Post Cemetery on your left. 

No car?
Taxi drivers may take you to the main sites, but this can be expensive. You can also hire a private guide. A recommended alternative is pre-booking a bus tour that covers the sites you are interested in visiting. 

Plan your time

Allow 1½ to 2 hours to explore the entire Holding the Line trail.

If you’re short of time, you can simply visit the must-do stop on the trail – Quinn’s Post. The audio guide to Quinn’s Post gives you the big-picture Holding the Line story.

Location Collection: 
Location Name: 
Holding the Line
Lat: 
40.23027075500171
Long: 
26.287245142822258

Take the next trail

The next Ngā Tapuwae trail is Chunuk Bair. Proceed to No 2 Outpost.
Link to the first stop

Decimal GPS:
74.51234869995749
-76.32464468750004
Sequence:
1
Decimal GPS:
74.64527866338169
-89.31048453125004
Sequence:
2
Decimal GPS:
75.08725557577952
-101.21966421875004
Sequence:
3
Decimal GPS:
75.35894441520114
-102.09857046875004
Sequence:
4
Decimal GPS:
75.4684211203972
-103.46087515625004
Sequence:
5
Decimal GPS:
75.78788290096271
-117.06194937500004
Sequence:
6
Decimal GPS:
75.45919210986763
-117.63323843750004
Sequence:
7
Decimal GPS:
75.51370929597266
-118.84173453125004
Sequence:
8
Decimal GPS:
76.41021976105979
-111.54681265625004
Sequence:
9

Stop Images

Sequence:
1
Decimal GPS Real Location:
40.23018
26.28766
Sequence:
2
Decimal GPS Real Location:
40.23291
26.28721
Sequence:
3
Decimal GPS Real Location:
40.23018
26.28766
Sequence:
4
Decimal GPS Real Location:
40.23833
26.29188
Sequence:
5
Decimal GPS Real Location:
40.23817
26.29141
Sequence:
6
Decimal GPS Real Location:
40.24226
26.28995
Sequence:
7
Decimal GPS Real Location:
40.24133
26.28818
Sequence:
8
Decimal GPS Real Location:
40.24168
26.28827
Sequence:
9
Decimal GPS Real Location:
40.24289
26.29462