1

Hill 60

Hill 60 https://ngatapuwae.govt.nz/gallipoli/the-defence Every remaining Anzac was called on. They would make one last attempt to take high ground at Gallipoli. Ngā Tapuwae Trails /sites/default/files/stop/media/05%20the%20defence%402x.jpg

Every remaining Anzac was called on. They would make one last attempt to take high ground at Gallipoli. 

This stop gives you the big-picture story for the whole trail in one go.
New Zealand story
Turkish story
Read this story

NZ story - Hill 60

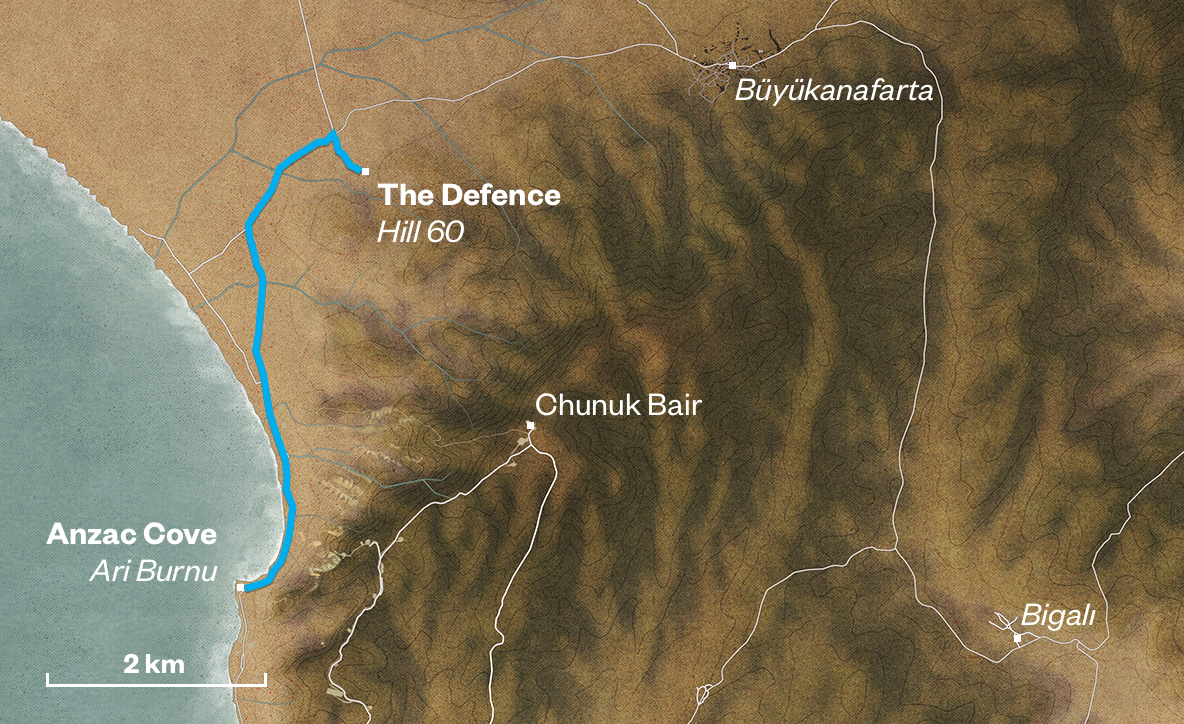
You’re standing in the cemetery at Hill 60 at the memorial plinth. If you look up to the high ground between the trees you can see the New Zealand monument on Chunuk Bair and the Turkish flag flying next to the statue of Mustafa Kemal, later Atatürk.

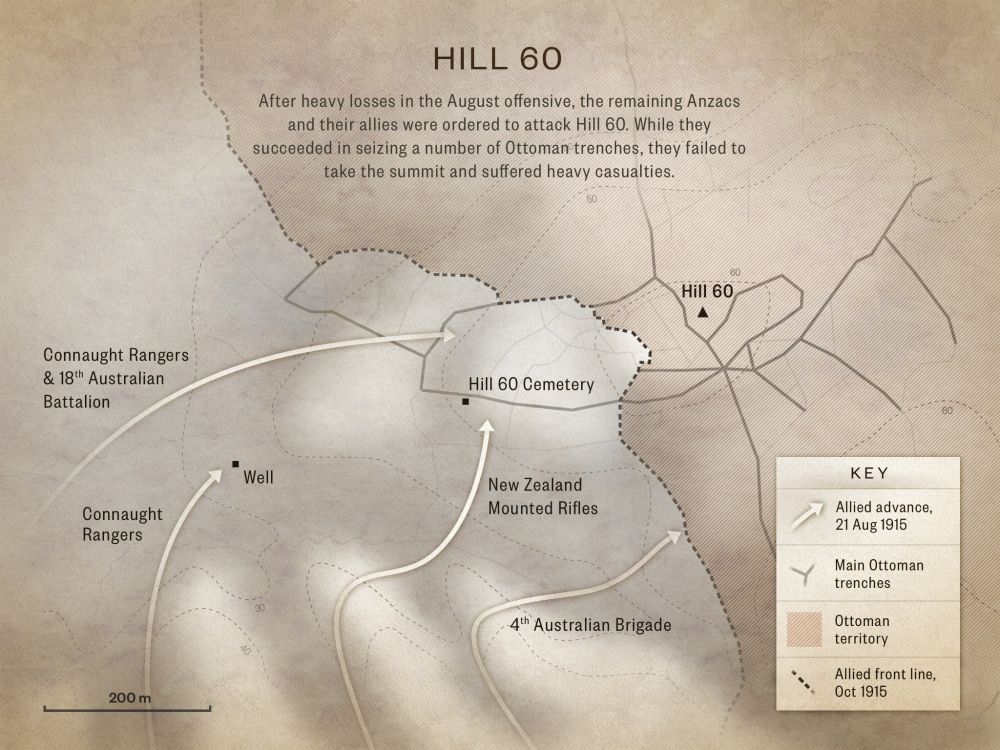
After the offensive of August 1915 there were no further attempts to seize the high ground from along Rhododendron Spur – there was a stalemate. The Hill 60 attack was mounted to seize this tiny pimple of land which was a junction point between the British at Suvla Bay and the Anzacs around Anzac Cove. There were some British, Indian and Australian troops, involved in the attack and a scratch force of exhausted New Zealanders. If you look at the photos of them before the attack, you’ll see men who were bearded with faces shrunken. Their eyes exhausted slits. 

So we had this attack on Hill 60.  I was a rake-in for that one. We all were. The left-overs. You just had to do what you were told and follow the leader. The men lined up for the attack were all fairly disgruntled and dejected. 
Bill East

Every man fit enough to carry a rifle had to take part. The attack would be launched on the 21st of August 1915. 

In the morning, General Godley came up and told us he wanted to take a Turkish trench out on the left that afternoon. We had to cross two gullies where it was safe to stop for a spell. Then we had to plough through a stretch of scrub, then open going in full view of the Turks. 
Edward Templar

The New Zealanders attacked from the ridge nearest to where you are standing. There was no artillery support, it was just infantry attacking with rifles and bayonets. The whistle blew and the men charged forward. That brush area to the north behind the cemetery was the Ottoman trench line. The New Zealanders captured the trenches in this area where you stand, and butted up against the Turks. There was only a row of sandbags between the two sides. It was bloody trench fighting with grenade and rifle and bayonet to the point of exhaustion. 

We had a roll call the next morning. Our one officer was killed plus the Sergeant Major, and there wasn’t one with a stripe amongst us.
Edward Templar

The New Zealanders managed to capture a chunk of the hill but General Hamilton, who was in charge of the Mediterranean Expeditionary Force, told General Birdwood, who commanded the Anzacs, to have another go. This would coincide with the next major Suvla attack on the 27th of August 1915. Once again, whoever was fit enough had to attack. Trooper Bill East, of the Wellington Mounted Rifles, was on the start line waiting for the attack. 

When the word came, Major Bruiser Taylor was right in front of me as he jumped to his feet. He had a sword he wasn’t supposed to have – because of swords drawing Turk fire. And he blew his whistle and pulled his sword out and shouted ‘Charge’.  The next thing he was flat on his face, shot through the head. 
Bill East

The death of Taylor typifies this battle for Hill 60. A tiny piece of land was taken but at tremendous cost, and this destroyed most of what was left of the New Zealand Mounted Rifles Brigade.

I decided to go forward and all the rest were coming with me across an open piece of ground. We were just anyone’s mutton. 
Bill East

One of the New Zealanders told me that ‘the dead lay like stooks after the harvest.’ If you’ve ever been in a wheat field, you’ll know exactly what he meant.  The names of the dead are commemorated on the memorial to the missing and in the headstones to the Mounted Rifles – a handful really – the 27 gravestones and the 180-odd names on the memorial.

Hill 60 was the final offensive effort by New Zealanders at Anzac. It was a pointless attack for a pointless piece of ground. It simply destroyed what was left of the New Zealand Mounted Rifles, and the top of the hill was never taken. 

I never cried, but it was the only time I felt like crying that day. Was Gallipoli worth it? Worth all that suffering?
Bill East

The New Zealanders were taken off Gallipoli in September to regroup on the Greek island of Lemnos. They received reinforcements from New Zealand but they were still at half strength. They then came back to garrison the Apex area, below the high ground of Chunuk Bair, until the December evacuation. At that time there were rumours, and it was obvious that something was taking place, but the men didn’t want to believe that there was going to be an evacuation because it meant failure and leaving their mates who were buried here behind. 

We could not understand two things. One was withdrawing in front of an enemy and the other was leaving our cobbers behind. You don’t know how that hurt the blokes. Only those who were there would know. We belonged to one another. 
Joe Gasparich

Almost every diary talks about the fact that they were going, and leaving their mates.  It was a brilliantly conducted evacuation, but no satisfaction for a battle lost. 

The trenches were solid with ice, and I could hear the sound of my boots echoing down the trench. Talk about empty. I was alone at last. Absolutely alone, for the first time in the war. Soon after that it was all over. We were off, still grieving for those we left behind.
Joe Gasparich

Read the Turkish story

Turkish story - Hill 60

The Anzacs named this place Hill 60 because it is 60 feet above sea level. The Turks know this area as Kaiajik Aghala, or sheepfold, which was named after a sheepfold that was here. A sheepfold is a sheep pen made of stones.  

The skirmishes at Hill 60 lasted from the 10th of August 1915, until the end of that month. 20 days of struggle went on here between the two sides, who both wanted to control the high ground. 

Someone said that the Anzacs used nearly 4,000 hand grenades here. That’s why the Turks called it Bomba Tepe, which means Bomb Hill, because so many explosives were thrown from one side to the other. 

The Turks were able to hold Hill 60, but for a little hill, there was a lot of struggle and about 1,000 Turks died here. About the same number of Allied soldiers died, in total, about 2,000 died all for this little piece of land. And the irony today is that very few people come here and visit. 

Hill 60, which lasted until the end of August, was the last major Allied attack of the Gallipoli campaign. After the battle, Mustafa Kemal, later known as Atatürk, wrote to Ottoman headquarters. He believed that the Allies would eventually evacuate Gallipoli, but the Turks didn’t have the strength to mount further major counter attacks. In order to find out whether the Allies were increasing or decreasing troop numbers, Mustafa Kemal believed that the Turks should carry out probing attacks. By selecting one piece of trench and attacking it, they would find out whether it was strongly held or not but the German commander of the Ottoman 5th Army, General von Sanders, did not agree. This benefited the Anzacs by ensuring they were not heavily attacked until they evacuated in December 1915.  

Until the final moment of the December evacuation, the Turks didn’t understand what was going on, though they got conflicting reports. When headquarters wanted confirmation that the Allies were evacuating, the soldiers on the ground couldn’t say for sure.

The Allies laid booby traps and barbed wire to prevent a Turkish advance. It was too risky to walk on the battlefield so there was a delay before the Turks finally reached the ANZAC lines on the 20th December and found out for certain that they had evacuated.

They say that on landing day God was on the Turkish side; on evacuation day God was on the Allies’ side. 

There are some anecdotes that suggest that the Turks knew the Allies were evacuating, but if they were to report it, they would be told by their German commanders to attack and nobody wanted to die. 

According to a German Colonel, Kannengiesser, the German officers organised a counterattack so as not to allow an easy Allied evacuation but they couldn’t make the Turks get out of the trenches. Apparently they were too tired and wondered what the point was in killing more people. It was better to let them go.

Even though the Turks successfully defended the land at Gallipoli, the Anzacs inflicted heavy losses on the Ottoman Army. This probably contributed to the defeats the Ottoman Army suffered in the Middle East and elsewhere later in the war. 

How to get here

Getting there

From Ari Burnu follow the coast road running north from Ari Burnu, passing Canterbury, No. 2 Outpost and New Zealand No. 2 Outpost cemeteries on the right of the road and then Embarkation Pier Cemetery on the left.

After Embarkation Pier Cemetery the road heads inland and a drive of 2.3 kms, passing 7th Field Ambulance Cemetery on the right, brings you to a fork in the road, with the left hand turn heading to the Suvla section and the right fork towards the village of Büykanafarta.

Just before the road forks, there is a dirt track signposted for Hill 60 Cemetery on the right. Follow this track for 600 metres till you reach the cemetery. Note that the track can be difficult to navigate after heavy rain.

Where to stand

Stan to the right of the memorial plinth and locate the New Zealand monument on Chunuk Bair on the horizon to the east through the trees.

GPS
40°16'21"N
26°17'34"E
Decimal GPS
40.27272
26.29299
  • A soldier carrying a machine gun during the advance on Hill 60.
    A soldier carrying a machine gun during the advance on Hill 60.Credits

    Soldier carrying machine gun during August advance, Gallipoli. Queen Elizabeth II Army Memorial Museum:Photographs of NZ forces in Egypt, Palestine and Gallipoli, World War I. Ref: 1/2-166953-F. Alexander Turnbull Library, Wellington, New Zealand.http://natlib.govt.nz/records/22753137

  • To prevent the Turks noticing the emptiness of the roads, fatigues were put on with instructions to lounge about and smoke. 17 December 1915
    To prevent the Turks noticing the emptiness of the roads, fatigues were put on with instructions to lounge about and smoke. 17 December 1915Credits

    Australian War Memorial G01288 http://www.awm.gov.au/collection/G01288/


  • Turkish prisoners taken at Hill 60 by the Otago Mounted Rifles, August 1915
    Turkish prisoners taken at Hill 60 by the Otago Mounted Rifles, August 1915Credits

    National Army Museum 1991.588 http://nam.recollect.co.nz/nodes/view/2798

  • A soldier standing at the supply dump at North Beach, prior to the fire on the 18 December 1915.
    A soldier standing at the supply dump at North Beach, prior to the fire on the 18 December 1915. Credits

    Australian War Memorial P10595.017.001 http://www.awm.gov.au/collection/P10595.017.001/


  • Looking across trenches at Hill 60 in 1915.
    Looking across trenches at Hill 60 in 1915.Credits

    Looking across trenches at Hill 60, Gallipoli Peninsula, Turkey, during World War I. Williams, Charles Athol, b 1899 : Photographs of Te Aute Station, Mangakuri Station, the Williams family, and Gallipoli Peninsula in Turkey during World War I. Ref: PAColl-0184-1-044. Alexander Turnbull Library, Wellington, New Zealand. http://natlib.govt.nz/records/22747828

Stories & Insights

Grant was a chaplain at Gallipoli, who frequently braved enemy fire to attend to the men.

A cemetery on the Gallipoli peninsula circa 1918

It broke the evacuating soldiers' hearts to leave dead friends, and they were determined to honour them.

A last farewell to his mates.

For the remaining Anzacs, exposed in their trenches, a stormy winter was the last straw.

Artificial poppies for sale for Anzac Day photographed circa 23 April 1951

New Zealanders demanded a way to remember - so the first Anzac Day was held in 1916.

Commander Mustafa Kemal (Ataturk) is fourth from the left. He is standing with the officers and staff of his Anafarta group.

From the Ottoman defence forces emerged Atatürk who, after the war, would spearhead the birth of the Turkish republic.

Twisleton was one of 400 sick, exhausted New Zealanders who took part in the Battle for Hill 60.

Powles and his regiment were some of the last to leave Gallipoli – they were among the ‘diehards’.

Taking The Defence  trail

WARNING: Many locations at Gallipoli are potentially dangerous, and there are undercut cliffs and sudden drops. Go slowly and carefully - and never stand close to a cliff's edge.

Get to Hill 60 (the start of this trail) from Anzac Cove

Follow the coast road running north from Ari Burnu, passing Canterbury, Outpost No. 2 and New Zealand Outpost No. 2 cemeteries on the right of the road and then Embarkation Pier Cemetery on the left. After Embarkation Pier Cemetery the road heads inland and a drive of 2.3 kms, passing 7th Field Ambulance Cemetery on the right, brings you to a fork in the road, with the left hand turn heading to the Suvla sector and the right fork towards the village of Büyükanafarta. Just before the road forks, there is a dirt track signposted for Hill 60 Cemetery on the right. Follow this track for 600 metres till you reach the cemetery. Note that the track can be difficult to navigate after heavy rain.

Your stop

Stand to the right of the memorial plinth and locate the New Zealand monument on Chunuk Bair on the horizon to the east through the trees.

Note: This is also the must-do stop for this trail.

No car?
Taxi drivers may take you to the main sites, but this can be expensive. You can also hire a private guide. Group bus tours generally do not cover the area around this trail.

Plan your time

Allow 2 – 3 hours to explore The Defence trail.

If you’re short of time, you can simply visit the must-do stop on the trail – Hill 60. The audio guide to Hill 60 gives you the big-picture story of The Defence trail.

Location Collection: 
Location Name: 
The Defence
Lat: 
40.27272
Long: 
26.29299

Take the next trail

The next Ngā Tapuwae trail is Cape Helles. Proceed to Kilitbahir.
Link to the first stop

Decimal GPS:
40.27272
26.29299
Sequence:
1
Decimal GPS:
40.28297
26.32337
Sequence:
2
Decimal GPS:
40.23637
26.3596
Sequence:
3

Stop Images

Sequence:
1
Decimal GPS Real Location:
40.27272
26.29299
Sequence:
2
Decimal GPS Real Location:
40.28297
26.32337
Sequence:
3
Decimal GPS Real Location:
40.23637
26.3596